Easily list your scientific equipment

Top suppliers for laboratory & industry

New and used instruments

Marketplace
Analytics
Brand
Radwag
Model
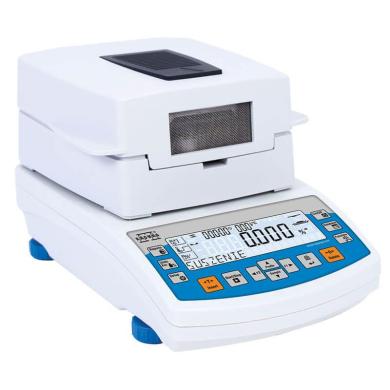
MA 210.R Moisture Analyzer
Supplier
Radwag
Location
Radom - Poland
Price
€1,342.00 
(ex. VAT)
This item is
for sale
State of item
new
Categories

Radwag MA 210.R Moisture Analyzer

Radwag€1,342.00 (ex VAT)
item image

Description by the supplier

Moisture analyzer is a laboratory measuring instrument intended to determine relative humidity for small samples of different materials. MA.R series redefines moisture analyzers standards.


The MA.R series


This series has been equipped with brand new readable LCD display providing an extra text line for information such as supplementary messages and data, e.g. product name or tare value.


The moisture analyzer, using respective pictograms, signalizes currently activated mode, computer connection and functions, both balance and service ones.


The MA.R series is enriched with various interfaces: RS232, USB type A,


USB type B and Wi-Fi. The moisture analyzer is housed in a plastic casing.


Databases:


Information system of R series moisture analyzers is based on 6 databases, allowing many operators to operate product database comprising many samples. Collected measurements may be subjected to subsequent analysis.


Collected data is registered in 6 databases:


Users (up to 10 users)


Products (up to 1000 products)


Weighings (up to 1000 weighings)


Tares (up to 100 tares)


Programs (up to 100 drying programs)


Drying process reports (up to 1000 reports)


The results


The results obtained using the moisture analyzer (the final result of the drying process):


% M – the mass loss in %; displays the mass change recorded during the drying process, expressed as a percentage,


% D – the dry mass obtained during the drying process, expressed as a percentage; the result is the portion of the sample that remains on the weighing pan after the moisture has evaporated,


% R – the ratio of moisture content to dry mass, obtained during the drying process, expressed as a percentage; the result is the portion of the sample that evaporated during the drying process,


g – the sample mass after drying.


Exchange of information within the system is performed by means of USB port on bi-directional basis. It is possible to import and export databases using memory sticks.


Direct access to information


It is possible to access functions and databases directly, using keyboard soft keys.


Database

– access to databases


Function

– access to basic functions


F1

and

F2

– programmable function keys and menu navigation keys


Reports

– access to database of drying process reports


Profile

– access to parameters settings


Sample

– access to products database

Product details
FunctionsAutotest, Statistics, GLP Procedures, Replaceable unit, Statistical Quality Control, ALIBI Memory, Drying modes, Samples drying, Moisture content analysis, Dry mass determination
About QuestPair

QuestPair matches professionals in research and industry with manufacturers, suppliers and resellers of scientific products. Companies and organisations can easily sign up for an account and showcase their laboratory equipment and other products on the marketplace. It is possible to list both new as well as used equipment. QuestPair features a variety of equipment for the physical, chemical and life sciences such as spectrometers, balances, centrifuges, testing devices, medical devices, incubators, microfluidics kit, heaters, coolers and other specialist instruments.

Related items:
Radwag F2 Mass Standard - Stainless Steel Wire - 200 mg-cover
Radwag F2 Mass Standard - Stainless Steel Wire - 200 mg

F2-class mass standards represent an impressive level of precision in mass measurement. Classified a (more)s metrology grade F2, they are recognized as top-quality tools suited for advanced applications where precision is a key element. F2 mass standard: stainless steel wire Nominal value: 200 mg Material: stainless steel Exceptional Measurement Precision F2 class mass standards feature excellent measurement precision achieved through stringent standards for allowable deviation from actual weight. Stability under Dynamic Conditions An important feature of F2-class mass standards is their ability to maintain measurement stability even under dynamic measurement conditions. They are designed to cope with a variety of factors that affect measurement precision. Calibration at the Highest Level The calibration process of F2-class mass standards adheres to the most stringent norms and standards. This makes the standards of this class recognized as tools with the highest degree of accuracy, complying with international requirements. Use of Materials with Outstanding Properties F2 class mass standards are often constructed from materials with outstanding physical properties. This ensures not only excellent precision, but also exceptional durability. Application 1. Scientific Research at the Highest Level In scientific research, especially in fields that require the utmost precision, such as nuclear physics or astrophysics, F2 class mass standards are indispensable. 2. Metrology Industry In metrology laboratories engaged in testing and maintaining the most advanced measurement standards, F2 class standards are indispensable working tools. 3. High-Precision Testing Laboratories In laboratories specializing in research requiring the highest precision, such as forensic laboratories and materials testing, F2 class mass standards are essential. 4. Aerospace Industry In the precision mass measurements required in the aerospace industry, F2 class standards provide reliability and excellence. F2 class mass standards are the symbol of the highest precision in the field of mass measurement. Their use is crucial in the most advanced fields of science, industry and research.

€34.00 ex VAT
Poland
mass standards
Radwag F1 Mass Standard - Stainless Steel Wire -100 mg-cover
Radwag F1 Mass Standard - Stainless Steel Wire -100 mg

F1 class mass standards are exceptional measuring tools that represent the pinnacle of precision in  (more)the field of metrology. Classified as F1 metrology class, they are perfect for advanced applications where every detail of measurement is of paramount importance. F1 class standard: stainless steel wire Nominal value: 100 mg Material: stainless steel Highest Precision and Accuracy F1 class mass standards are characterized by absolute measurement precision and extraordinary accuracy. They are designed to meet the most stringent standards for acceptable deviation from actual weight. Stability under Difficult Conditions An important feature of F1 class mass standards is their ability to maintain measurement stability even under harsh environmental conditions. The standards of this class are resistant to changes in temperature, humidity and other factors that affect the precision of measurements. Calibration in Accordance with International Standards The calibration process for F1-class mass standards is rigorous and in accordance with international standards. This ensures that standards of this class are globally recognized and can be used in different countries. Specialized Construction Materials F1-class standards are often made of materials with unique physical properties. This provides them not only with precision, but also with durability and wear resistance. Applications 1. Industrial Metrology F1 class mass standards are used in metrology laboratories engaged in the testing and maintenance of measurement standards. 2. Scientific Research In scientific research, especially in high-precision fields such as physics and astronomy, F1-class mass standards are a key tool. 3. Aerospace Industry In the precision mass measurements required by the aerospace industry, F1-class standards guarantee reliability and accuracy. 4. Calibration Laboratories In calibration laboratories where uniformity and precision are a priority, F1-class mass standards are the standard of excellence. F1-class mass standards are synonymous with the highest quality and precision in the field of metrology. Their use is crucial where even the slightest deviation from the standard can carry unpleasant consequences. They are tools for advanced applications that contribute to raising standards in the field of mass measurement.

€38.00 ex VAT
Poland
mass standards
People are watching right now:
Scout SKX8200 Ohaus-cover
Scout SKX8200 Ohaus

New generation! The OHAUS Scout Scale, with its large backlit LCD display and integrated educational (more) software is the ideal tool for use in the classroom. Offering world-class overload protection, fast stabilization times, increased capacity, more connection options, and a stackable design—the ultimate educational weighing experience. - Excellent overload protection and practical stackable design - Backlit LCD display and 4-button operation: very easy to use in all conditions - High weighing speed and high resolution display The OHAUS Scout scale can be equipped with various connectivity options: RS232, USB, USB device, Ethernet or Bluetooth®. These options ensure a more modern and smarter student experience, increasing accuracy and efficiency. Other Standard Features and Equipment Transport lock, stainless steel weighing pan, menu and adjustment lockout switch, software and mechanical overload/underload protection, stability indicator, auto tare, low battery indicator, auto power off user selectable print options and communication settings. Applications Weighing: allows you to calculate the weight of the samples in the selected unit of measure. Density determination: calculation of the density of solids or liquids. With the built-in weigh below hook, you can test for the specific gravity of objects that cannot be placed on the weighing pan. Molar Concentration: Calculate the mass of a sample and automatically convert to the molar concentration. MODELS AVAILABLE: Applications Weighing, determination of density, weighing of moles Screen Liquid crystal display (LCD) with backlight Operation AC adapter (included) or 4 AA batteries (not included) Communication RS232, USB host, USB device, Ethernet or Bluetooth™ (available as an accessory) Construction ABS housing, stainless steel bowl, ABS draft shield (1 mg model only), bottom weigh hook, transport lock, manual calibration lock switch, security slot Project features Stability indicator, stackable design with storage lid included (excluding 1 mg model), mechanical and software over/underload protection, low battery indicator, auto power off, auto tare, span calibration mass included in models with capacity up to 620 g NO MORE BROKEN SCALES! The excellent overload protection of the Scout balance consists of a weighing pan made of high-strength stainless steel and a pan support made of impact-resistant plastic. The system allows the balance to safely support loads up to 10 times its rated capacity, withstanding use in even the most demanding educational environments. In addition, the integrated transport lock protects the load cell from damage during transport, stacking and storage.

€275.00 ex VAT
€327.25 incl. VAT if applicable
Italy
analytical balances accessories, balances accessories
Radwag HX7.4N.300/600.H4 Multifunctional Stainless Steel Ramp Scale-cover
Radwag HX7.4N.300/600.H4 Multifunctional Stainless Steel Ramp Scale

The HX7.4N H scale is a device controlled by means of the PUE HX7 indicator, and it has been equippe (more)d with a 4-load-cell ramp platform made of stainless steel, AISI 304. This robust design facilitates weighing of heavy loads in humid environment. The ramps enable easy loading and unloading. Indicator with a colour 7” graphic display and a diode bar graph allow to observe visualisation of a current load mass presented in relation to the scale range or declared minimum and maximum thresholds. This makes the operation significantly easier. At the back of the housing there are hermetic connectors of RS232, RS485, USB and Ethernet communication interfaces, plus digital inputs/outputs and analogue output. This enables cooperation with external devices such as barcode scanners, printers, external displays, control buttons, light signalling towers, other controlling/signalling devices, systems for automatic process control and superior IT systems. With use of the bracket you can either place the indicator at any flat horizontal surface, or fix it to the wall adjusting the tilt respectively to suit your needs. The terminal's software allows carrying out processes such as weighing, parts counting, dosing, labelling, formulations and percent weighing. Indicator’s system of information is based on databases (users, products, weighings, packaging, formulations, customers) and ALIBI memory which guarantees stored data safety.

Poland
platform scales, ramps, ramp scales
Disclaimer: QuestPair assumes no responsibility or liability for any errors or omissions in the content of this site. The information contained in this site is provided and presented on an “as is“ basis with no guarantees of completeness, accuracy, usefulness or timeliness.

Customer Service

Here to help you with: Product Inquiries, Shipping & Support, Technical Support, Business Inquiries and Press.

We are available to assist you Mon-Fri, 10am - 5pm CET.
+31 (0) 73 7114717
[email protected]