Easily list your scientific equipment

Top suppliers for laboratory & industry

New and used instruments

Marketplace
Analytics
Supplier
Marshall Scientific
Location
Hampton - United States
Price
$1,373.00 
(ex. VAT)
This item is
for sale
State of item
new
Categories

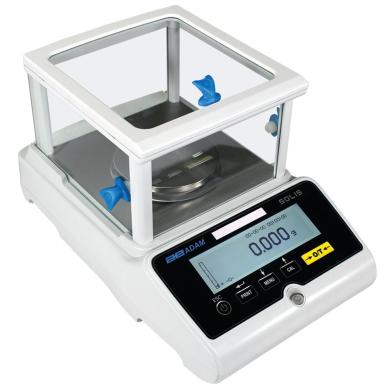
Adam Equipment SPB 363E Solis Precision Balance, 360g, 0.001g

Marshall Scientific$1,373.00 (ex VAT)
item image

Description by the supplier

Adam Equipment SPB 363E Solis Precision Balance, 360g, 0.001g


Capacity

360g

Readability

0.001g

Repeatability

0.002g


Features

- High-resolution graphic display is amply sized for clear visibility

- Level indicator and adjustable feet ensure proper balance setup for optimum weighing results

- Large, grade 304 stainless steel pan allows swift cleaning

- RS-232 interface provides speedy connection to computers and printers

- External calibration allows for verification and adjustment with weights ("I" models feature internal automatic calibration)

- Selectable digital filtering helps minimize effects of vibration and disturbances

- Printouts include date and time for data tracking within Good Laboratory Practices (GLP) guidelines

- Multilingual display permits use in various regions

- Check weighing with audible alarm

- Parts counting with preset sample sizes

- Security slot for optional lock and cable to help prevent theft


The Adam Equipment Solis Precision Balances are ideal for research and quality assurance labs, science education, precision counting, production, and manufacturing applications needing precision results. Users can readily view the comprehensive data on the amply sized graphic display. A multilingual display capability permits use of the balance in various regions, while recognizable icons help the weighing process flow smoothly. Formulation is simplified, as Solis stores up to 99 ingredients. The Solis keypad is simple to use, with easy-to-read buttons and helpful navigation arrows for uncomplicated operation. The Solis Precision Balance line features 11 different models that offer internal or external calibration, capacities from 360g to 8200g, and readabilities from 0.001g to 0.01g. The Solis Precision Balances provide an outstanding solution for a variety of lab applications.


INCLUDED:

The Adam Equipment SPB 363E Solis Precision Balance, 360g, 0.001g includes:

- Power Cord

- Operator's Manual

- Manufacturer's Documentation

- 5 Year Manufacturer's Warranty

Product details
ModelSPB 363e
Capacity360g
Readability0.001g
Repeatability (S.D.)0.002g
Linearity (+/-)0.003g
Minimum Weight (USP, typical)4.0g
Pan Size4.3" ø / 110mm ø
Weighing Unitsg, mg, lb, oz, ct, GN, dwt, mm, ozt, T, tl.H, tl.S, tl.T, custom unit
Stabilization Time (sec)3
InterfaceRS-232
CalibrationExternal calibration
DisplayGraphic display with 0.6"/ 15mm -high digits
Power Supply9VDC 1A adapter
Operating Temperature10° to 30°C / 50° to 86°F
HousingABS plastic
Draft Shield Chamber7.6"x7.7"x4.5" / 192x195x115mm
Overall Dim.8.8"x14.7"x8.6" / 224x374x219mm (wxdxh)
Net Weight14.1lb / 6.4kg
About QuestPair

QuestPair is a platform to find and acquire laboratory equipment by connecting research organisations, universities, and companies with high-quality, affordable instruments. The platform facilitates multiple sales daily worldwide and works with partners around the globe to provide trusted, vetted products for a wide variety of scientific needs. Our in-house developed AI algorithms collect data on the usage and availability of scientific instruments, enabling us to provide tailor-made assistance in sourcing suitable laboratory equipment. With a focus on cost-effectiveness and sustainability, QuestPair has an excellent track record in streamlining acquisitions for laboratories to further scientific research and development.

Related items:
Radwag F2 Mass Standard - Stainless Steel Wire - 500 mg-cover
Radwag F2 Mass Standard - Stainless Steel Wire - 500 mg

F2-class mass standards represent an impressive level of precision in mass measurement. Classified a (more)s metrology grade F2, they are recognized as top-quality tools suited for advanced applications where precision is a key element. F2 mass standard: stainless steel wire Nominal value: 500 mg Material: stainless steel Exceptional Measurement Precision F2 class mass standards feature excellent measurement precision achieved through stringent standards for allowable deviation from actual weight. Stability under Dynamic Conditions An important feature of F2-class mass standards is their ability to maintain measurement stability even under dynamic measurement conditions. They are designed to cope with a variety of factors that affect measurement precision. Calibration at the Highest Level The calibration process of F2-class mass standards adheres to the most stringent norms and standards. This makes the standards of this class recognized as tools with the highest degree of accuracy, complying with international requirements. Use of Materials with Outstanding Properties F2 class mass standards are often constructed from materials with outstanding physical properties. This ensures not only excellent precision, but also exceptional durability. Application 1. Scientific Research at the Highest Level In scientific research, especially in fields that require the utmost precision, such as nuclear physics or astrophysics, F2 class mass standards are indispensable. 2. Metrology Industry In metrology laboratories engaged in testing and maintaining the most advanced measurement standards, F2 class standards are indispensable working tools. 3. High-Precision Testing Laboratories In laboratories specializing in research requiring the highest precision, such as forensic laboratories and materials testing, F2 class mass standards are essential. 4. Aerospace Industry In the precision mass measurements required in the aerospace industry, F2 class standards provide reliability and excellence. F2 class mass standards are the symbol of the highest precision in the field of mass measurement. Their use is crucial in the most advanced fields of science, industry and research.

€34.00 ex VAT
Poland
mass standards
Radwag E1 Mass Standard - Stainless Steel Wire -20 mg-cover
Radwag E1 Mass Standard - Stainless Steel Wire -20 mg

E1-class mass standards are the elite in the world of metrology, because standards of this class rep (more)resent the highest level of precision and accuracy in mass measurement. The E1 classification is one of the most stringent standards that standards must meet in order to be considered the most advanced and trustworthy measurement tools. E1 - class standard: stainless steel wire Nominal value: 20 mg Material: stainless steel What Are the Characteristics of the E1 Class? Highest Precision - The allowable deviation from the actual weight is minimal, making standards of this class ideal for applications where every gram matters. Stability and Repeatability - This guarantees a consistent level of accuracy over the long term. Accurate Calibration - Standards of this class must be regularly compared with other standards of known mass to confirm their measurement accuracy. Materials with Unique Properties - E1 class mass standards are often made of materials with exceptional physical properties, which makes them stable and resistant to changes in environmental conditions. Application 1. Analytical Laboratories In analytical laboratories where accurate measurements are crucial, E1 class mass standards are used to calibrate balances with the highest precision. 2. Pharmaceutical Industry In drug manufacturing, where even the slightest deviation from the standard affects quality, E1 class mass standards are irreplaceable. 3. Scientific Research In scientific research, especially in areas requiring the highest precision, such as physics or chemistry, E1 class mass standards are used to ensure reliable results. 4. Metrology Industry In metrology laboratories where research on E1 class mass standards alone is carried out, E1 class standards are the standard of excellence. Class E1 mass standards are not only measuring tools, but also a symbol of metrological excellence. Their use affects the quality of measurements in various areas of life because they provide precision that can be relied upon. They are a key element in the world of mass measurement, shaping standards and raising the bar for all measurement tools.

€71.00 ex VAT
Poland
mass standards
Radwag MA 50/1.5Y.WH Moisture Analyzer-cover
Radwag MA 50/1.5Y.WH Moisture Analyzer

Do you need a moisture analyzer that not only determines moisture or dry matter content with impress (more)ive accuracy, but also performs a digital audit, responds to your voice commands and sends you light messages? If so, learn about the functionality of the ELLIPSIS series of moisture analyzers: It Dries in 4 Ways The MA 5Y Moisture Analyzer offers you four drying profiles: standard, mild, fast and step. The standard profile is the usually used drying profile. It allows the most accurate determination of moisture content. The mild profile is designed for drying substances that are sensitive to the rapid heat released by the filaments, which heat full power at the initial stage of the process. An example of such a substance is leather. You will use the fast profile for samples with significant moisture content – of the order of even several tens of percent. The step profile will be ideal for drying substances that contain more than 15 percent moisture. Within this profile you can define any three temperatures. You will choose the values of temperature and duration of heating experimentally. What Drying Temperature Should I Set? The drying temperature determines the duration of the process. Its value depends on the type of material. If the temperature is too low, it will under-dry the sample and, consequently, unnecessarily increase the measurement time, while if it is too high, it will cause a burning effect on the material. The drying temperature for the traditional (oven) method is determined by industry or factory standards. If there are no standards, you will select the temperature experimentally. The maximum drying temperature on the MA 5Y Moisture Analyzer is 160°C. How Do I Finish the Drying? In 4 Ways The MA 5Y Moisture Analyzer has four finish modes: automatic, manual, time-defined and user-defined. Automatic mode You define the moisture loss limit value in 60 seconds. When the moisture analyzer reaches the set criterion, the measurement will automatically end. Manual mode You terminate the measurement yourself by pressing the STOP button. Time-defined mode The measurement ends after the set time has elapsed regardless of the result. You have up to 99 hours 59 minutes to manage! User-defined mode When you remove all volatiles from a sample, by definition, its mass should be constant. During drying, the dry mass of the sample is defined by a condition: if the mass of the sample is stable within 1 mg during the observation time (Auto 1-5), we consider that all volatile components have been removed from its structure. Digital Weighing Auditor Ensures that your moisture analyzer is ready for use. What is more, it informs about the need for a moisture analyzer inspection or a periodic audit of the moisture analyzer’s accuracy and sensitivity. 10-Inch Display Bigger screen – 10’’ – means more information in one place. On the new ELLIPSIS terminal, you will see up to 3 screens, widgets, graphs, statuses, notes, handy measurement history. Uncompromising User Verification For the first time ever, the moisture analyzer will verify the user using a password, RFID card, fingerprint reader, facial recognition mechanism, or any combination of these. Ambient Light – an Innovative Way for the Moisture Analyzer to Communicate With the User The light colour will tell you about status, process results, procedures, or alerts. Hotspot Use the moisture analyzer on any device connected to it. This can be a smartphone, tablet, or computer. RFID ELLIPSIS works with RFID tags* that can be used to tag your products or formulation ingredients in the database. They can also be used to identify a user. Live Note – Note Down Your Conclusions It’s the first time you can add a voice memo to a measurement series or procedure report. If you prefer to write it down, ELLIPSIS allows you to add a text note. Handy Library This is where a series of recent measurements or a report ready for digital signature, according to 21 CFR Part 11, can be found. Widgets Prepared to display what you need most at any given moment. 21 CFR Part 11 Do you work in the pharmaceutical industry? Do you need a digital signature? We are offering the moisture analyzer which as a standalone fully meets the requirements of 21 CFR Part 11/ EU GMP Annex 11. Full data security Electronic signatures Validations Electronic records Audit trails Modbus TCP/IP is one of the most popular communication protocols in industrial automation. Implementing it in the 5Y balances and CY10 scales makes the devices of this series friendly to automation integrators. A balance or scale in a Modbus system is a slave device and performs tasks specified by the master device which is most often a PLC. Protocol Modbus TCP/IP in the 5Y balances and C10 scales enables, among other things, the realization of mass readout, zeroing and tare functions of the device, as well as tare settings and MIN and MAX thresholds. * RFID ISO/IEC 14443 Type A, 13.56 MHz

€3,620.00 ex VAT
Poland
moisture analysers, balances
People are watching right now:
Scilogex MicroPette Plus Autoclavable Pipettor, 1000-5000ul-cover
Scilogex MicroPette Plus Autoclavable Pipettor, 1000-5000ul

Scilogex MicroPette Plus Autoclavable Pipettor, 10-100ul Volume Range 1-5mL Adjustable or Fixed Volu (more)me Adjustable Volume Accuracy (±%) 0.50/0.60/0.70 Features - Fully autoclavable at 121°C - Ergonomic design provides excellent operating experience - Easy-to-read volume display - The pipettes cover the volume range from 0.1μL to 10mL - Integral tip ejector for access into narrow tubes - Easy to calibrate and maintain with tool supplied - Used with 'universal' pipette tips - Each MicroPette Plus supplied with an individual calibration certificate according to ISO8655. The MicroPette Plus pipettes are fully autoclavable, enable easy cleaning and reduce the risk of contamination. Steam autoclaving can be performed at 121°C, 1 bar for 20 minutes. After autoclaving, the pipette must be cooled down and left to dry for 12 hours before use. It is recommended to check the performance of the pipette after each autoclaving. Greasing and sealing of the pipette piston after every 10th autoclaving will secure an enhanced function. All SCILOGEX pipettes have been quality tested according to ISO8655-2:2002 and are supplied with individual calibration certificates. The quality control includes gravimetric testing of each pipette with distilled water at 22°C. Volume adjustment is selected by turning the thumb plunger mechanism. MicroPette's are calibrated in accordance ISO/DIS 8655. Each pipettor passes a quality control/calibration test and is supplied with a certificate. INCLUDED: The Scilogex MicroPette Plus Autoclavable Pipettor, 10-100ul includes: - Operator's Manual - Manufacturer's Documentation - 1 Year Manufacturer's Warranty

$179.00 ex VAT
United States
autoclaves or sterilizers
Disclaimer: QuestPair assumes no responsibility or liability for any errors or omissions in the content of this site. The information contained in this site is provided and presented on an “as is“ basis with no guarantees of completeness, accuracy, usefulness or timeliness.

Customer Service

Here to help you with: Product Inquiries, Shipping & Support, Technical Support, Business Inquiries and Press.

We are available to assist you Mon-Fri, 10am - 5pm CET.
+31 (0) 73 7114717
[email protected]