Easily list your scientific equipment

Top suppliers for laboratory & industry

New and used instruments

Marketplace
Analytics
Brand
Sartorius
Supplier
LabMakelaar Benelux B.V.
Location
Zevenhuizen - Netherlands
Price
€400.00 
(ex. VAT)
This item is
for sale
State of item
used
Categories

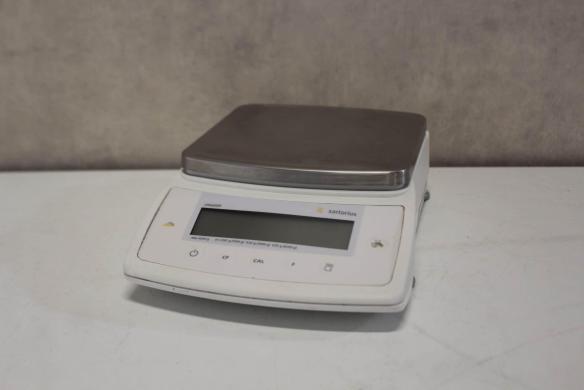
Sartorius CPA6202P Precision Balance

LabMakelaar Benelux B.V.€400.00 (ex VAT)
item image

Description by the supplier

Weighing capacity: 1500/3000/6200 g


Readability (0 – 1500 g): 0.01 g


Readability (1500 – 3000 g): 0.02 g


Readability (3000 – 6200 g): 0.05 g


Repeatability (0 – 1500 g): ≤ ±0.01 g


Repeatability (1500 – 3000 g): ≤ ±0.01 g


Repeatability (3000 – 6200 g): ≤ ±0.03 g


Linearity (0 – 1500 g):  ≤ ±0.02 g


Linearity (1500 – 3000 g):  ≤ ±0.02 g


Linearity (3000 – 6200 g):  ≤ ±0.05 g


Response time (average): ≤ 1.5 s


Weighing pan: 190 x 204 mm


Dimensions (WxDxH): 213 x 342 x 88 mm


Weight: 4.7 kg

About QuestPair

QuestPair is a platform to find and acquire laboratory equipment by connecting research organisations, universities, and companies with high-quality, affordable instruments. The platform facilitates multiple sales daily worldwide and works with partners around the globe to provide trusted, vetted products for a wide variety of scientific needs. Our in-house developed AI algorithms collect data on the usage and availability of scientific instruments, enabling us to provide tailor-made assistance in sourcing suitable laboratory equipment. With a focus on cost-effectiveness and sustainability, QuestPair has an excellent track record in streamlining acquisitions for laboratories to further scientific research and development.

Related items:
Sartorius Practum 6101-1S Balance-cover
Sartorius Practum 6101-1S Balance

This listing is for a Sartorius Practum 6101-1S Balance. The unit is in full working condition and  (more)is ready for immidate realese. The laboratory balance that enables you to start weighing right! Unmatched reliability attained by the Sartorius weighing technology featuring quality made in Germany. Innovative housing design and rugged weigh cell for easy weighing, whatever you weigh. Outstanding connectivity without the need for any additional software. Just connect the balance to your computer and transfer your data directly to a Microsoft ® Excel spreadsheet, for example. If you need to print your results, the laboratory balance’s automatic detection of the Sartorius standard printer Practum® - the laboratory balance that enables you to start weighing right! Unmatched reliability attained by the Sartorius weighing technology featuring quality made in Germany. Innovative housing design and rugged weigh cell for easy weighing, whatever you weigh. Outstanding connectivity without the need for any additional software. Just connect the balance to your computer and transfer your data directly to a Microsoft® Excel spreadsheet, for example. If you need to print your results, the laboratory balance’s automatic detection of the Sartorius standard printer YDP40 will make it easy. The sturdy draft shield will stand up to daily rigors, even to use by inexperienced operators. Moreover, it can be completely disassembled to conveniently clean the glass parts in a dishwasher.

£250.00 ex VAT
United Kingdom
balances
Radwag F2 Mass Standard - Stainless Steel Wire - 500 mg-cover
Radwag F2 Mass Standard - Stainless Steel Wire - 500 mg

F2-class mass standards represent an impressive level of precision in mass measurement. Classified a (more)s metrology grade F2, they are recognized as top-quality tools suited for advanced applications where precision is a key element. F2 mass standard: stainless steel wire Nominal value: 500 mg Material: stainless steel Exceptional Measurement Precision F2 class mass standards feature excellent measurement precision achieved through stringent standards for allowable deviation from actual weight. Stability under Dynamic Conditions An important feature of F2-class mass standards is their ability to maintain measurement stability even under dynamic measurement conditions. They are designed to cope with a variety of factors that affect measurement precision. Calibration at the Highest Level The calibration process of F2-class mass standards adheres to the most stringent norms and standards. This makes the standards of this class recognized as tools with the highest degree of accuracy, complying with international requirements. Use of Materials with Outstanding Properties F2 class mass standards are often constructed from materials with outstanding physical properties. This ensures not only excellent precision, but also exceptional durability. Application 1. Scientific Research at the Highest Level In scientific research, especially in fields that require the utmost precision, such as nuclear physics or astrophysics, F2 class mass standards are indispensable. 2. Metrology Industry In metrology laboratories engaged in testing and maintaining the most advanced measurement standards, F2 class standards are indispensable working tools. 3. High-Precision Testing Laboratories In laboratories specializing in research requiring the highest precision, such as forensic laboratories and materials testing, F2 class mass standards are essential. 4. Aerospace Industry In the precision mass measurements required in the aerospace industry, F2 class standards provide reliability and excellence. F2 class mass standards are the symbol of the highest precision in the field of mass measurement. Their use is crucial in the most advanced fields of science, industry and research.

€34.00 ex VAT
Poland
mass standards
Radwag MA 50/1.X7.A.NS Moisture Analyzer-cover
Radwag MA 50/1.X7.A.NS Moisture Analyzer

MA X7.A moisture analyzers are hi-tech measuring instruments intended for quick determination of rel (more)ative moisture content, dry mass content and other parameters in samples of different substances. MA.X7.A series is equipped with innovative system: the drying chamber can be opened and closed automatically using button or proximity sensors. Such solution allows: Maintaining moisture analyzer clean – operator does not touch moisture analyzer’s housing. Removing any shocks caused by manual closing of the chamber – the chamber closes automatically and always with the same intensity. Achieving high repeatability of opening and closing the drying chamber. Enhancing drying process automation. Enhancing safety of operation by eliminating contact with hot components of drying chamber. Improving operation ergonomics. MA.X7.A series features user-friendly colour touchscreen. Free configuration of the control panel can be done by means of hotkeys, customizable information fields and programmable labels. Drying process can be carried out for any temperature and – thanks to databases – particular drying process may be set for a specific product. Highlights of X7 Series moisture analyzers: Automatic opening and closing of the drying chamber 7” capacitive colour touchpad Modern interface Uncomplicated, intuitive operation Programmable display Drying profiles (standard, mild, step, fast) GLP/GMP printouts-reports Repeatable and customized applications Work optimization due to the use of halogen lamps Capacity and temperature MA.X7.A maximum capacity ranges from 50g/0.1mg to 210g/0.1mg. Moisture content is measured with the 0.01% accuracy (0.001 % for samples bigger than 1.5g). The maximum drying temperature is 160˚C (there is an optional moisture analyzer with 250˚C maximum temperature). An additional element for moisture analyzers that improves their functionality is a water vapour permeability determination set used in tanning industry for determining hygienic properties of leather. Databases: Information system of X7 series moisture analyzers is based on 8 databases, allowing many users to operate product database comprising many samples. Collected measurements may be subjected to subsequent analysis. Collected data is registered in 8 databases: Products (up to 5000 products) Users (up to 100 users) Packaging (up to 100 packagings) Customers (up to 1000 customers) Drying programs (up to 200 drying programs) Drying process reports (up to 5000 drying process reports) Ambient conditions (up to 10000 records) Weighings (up to 50000 records) The results The results obtained using the moisture analyzer (the final result of the drying process): % M – the mass loss in %; displays the mass change recorded during the drying process, expressed as a percentage, % D – the dry mass obtained during the drying process, expressed as a percentage; the result is the portion of the sample that remains on the weighing pan after the moisture has evaporated, % R – the ratio of moisture content to dry mass, obtained during the drying process, expressed as a percentage; the result is the portion of the sample that evaporated during the drying process, g – the sample mass after drying. Interfaces USB interface ensures quick transfer and copying of any results of your work (measurements, reports, databases) to a computer or other moisture analyzer. Remote access to the moisture analyzer allows for online data management. Cooperation with E2R allows for external data management which in turn increases the efficiency and results to the maximum.

€1,936.00 ex VAT
Poland
balances, moisture analysers
Radwag M1 Mass Standard - Flat Polygonal Sheet - 5 mg-cover
Radwag M1 Mass Standard - Flat Polygonal Sheet - 5 mg

Class M1 mass standards are versatile measuring tools characterized by their high precision and vers (more)atility in laboratory, industrial or commercial applications. Classified as M1 metrology class, they are valued for their versatility and accuracy in mass measurement. M1 mass standard: flat polygonal sheet Nominal value: 5 mg Material: aluminum M1 Class Mass Standards – Key Features High-Level Precision - M1 class mass standards are designed to ensure precision in mass measurements. Permissible deviations from the actual mass are set with strict standards. Versatility of Applications - Characterized by versatility, M1-class standards are used in fields such as laboratories, industry, commerce and other areas requiring precise weight measurements. Measurement Stability - M1-class mass standards are stable over time, meaning that they maintain their measurement precision even despite prolonged use. This feature is especially important for tools that are used regularly. Operation in a Wariety of Ambient Conditions - M1 class mass standards are designed to cope with both laboratory, industrial and commercial conditions. Application 1. Analytical Laboratories In analytical laboratories where precise measurements are crucial, Class M1 mass standards are used to calibrate medium-precision balances. 2. Manufacturing Industry In the manufacturing industry, where product quality control is important, M1 class mass standards can be used to calibrate balances used in the manufacturing process. 3. Weighing Trade In the weighing trade, where measurement precision is required by law, M1 class mass standards can be used as a reference for calibrating commercial balances. 4. Testing Laboratories In research laboratories, Class M1 mass standards can be used to ensure precise weight measurements. Class M1 mass standards are versatile tools that are used in various areas of life. Their ability to adapt to different conditions makes this class of standards highly valued in the world of science, industry and commerce alike.

€10.00 ex VAT
Poland
mass standards
People are watching right now:
Disclaimer: QuestPair assumes no responsibility or liability for any errors or omissions in the content of this site. The information contained in this site is provided and presented on an “as is“ basis with no guarantees of completeness, accuracy, usefulness or timeliness.

Customer Service

Here to help you with: Product Inquiries, Shipping & Support, Technical Support, Business Inquiries and Press.

We are available to assist you Mon-Fri, 10am - 5pm CET.
+31 (0) 73 7114717
[email protected]