Easily list your scientific equipment

Top suppliers for laboratory & industry

New and used instruments

Marketplace
Analytics
Brand
Radwag
Model
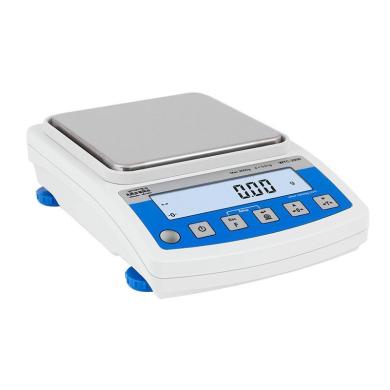
WTC 3000 Precision Balance
Supplier
Radwag
Location
Radom - Poland
Price
€272.00 
(ex. VAT)
This item is
for sale
State of item
new
Categories

Radwag WTC 3000 Precision Balance

Radwag€272.00 (ex VAT)
item image

Description by the supplier

Precision Balance WTC


Fast and accurate mass determination both in the lab and in the factory. Energy-efficient electronics and display, combined with an internal rechargeable battery, are the perfect duo to allow you to work without access to mains power.


Precision not just in the name


When we designed this balance, we took care of the smallest details – both those you can’t see, hidden in the solid housing, and those you can touch. This balance is the result of a combination of our experience and true precision.


The power of steel


The use of stainless steel for the pan guarantees you a long life for the balance. It is not afraid of contact with moist objects or accidental splashes.


Time counts


The balance is equipped with a real-time clock that provides accurate time measurement in a way that is independent of external power supply.


It has been with us for years, and will stay for a long time to come


The LCD display has accompanied us for long years. During this time it has proven its reliability. It guarantees the readability of the result from many angles and is energy efficient.


Internal power


No access to mains power? Power failure? No problem. The internal rechargeable battery combined with the energy-saving display and electronics allow many hours of operation without mains power.


Anything else?


Plenty! Printer, computer, USB flash drive, additional display – the WTC balance can work with them through communication interfaces. In addition, a real-time clock and ALIBI memory. You can find all accessories in our regular offer. And if you have questions about compatibility, our experts will help you.


Do you need ALIBI?


There you have it. ALIBI memory is like a black box of a balance. It records all measurements taken on the device. The ALIBI memory cannot be modified or erased.


THBR 2.0 System


Cooperation with THBR 2.0 System for ambient conditions monitoring.

Product details
FunctionsPlus/Minus Control, Percent Weighing, Parts counting, Peak hold, GLP Procedures, ALIBI Memory
About QuestPair

QuestPair matches professionals in research and industry with manufacturers, suppliers and resellers of scientific products. Companies and organisations can easily sign up for an account and showcase their laboratory equipment and other products on the marketplace. It is possible to list both new as well as used equipment. QuestPair features a variety of equipment for the physical, chemical and life sciences such as spectrometers, balances, centrifuges, testing devices, medical devices, incubators, microfluidics kit, heaters, coolers and other specialist instruments.

Related items:
Radwag F2 Mass Standard - Flat Polygonal Sheet - 1 mg-cover
Radwag F2 Mass Standard - Flat Polygonal Sheet - 1 mg

F2-class mass standards represent an impressive level of precision in mass measurement. Classified a (more)s metrology grade F2, they are recognized as top-quality tools suited for advanced applications where precision is a key element. F2 mass standard: flat polygonal sheet Nominal value: 1 mg Material: aluminum F2 Class Mass Standards – Key Features Exceptional Measurement Precision - F2 class mass standards feature excellent measurement precision achieved through stringent standards for allowable deviation from actual weight. Stability under Dynamic Conditions - An important feature of F2-class mass standards is their ability to maintain measurement stability even under dynamic measurement conditions. They are designed to cope with a variety of factors that affect measurement precision. Calibration at the Highest Level - The calibration process of F2-class mass standards adheres to the most stringent norms and standards. This makes the standards of this class recognized as tools with the highest degree of accuracy, complying with international requirements. Use of Materials with Outstanding Properties - F2 class mass standards are often constructed from materials with outstanding physical properties. This ensures not only excellent precision, but also exceptional durability. Application 1. Scientific Research at the Highest Level In scientific research, especially in fields that require the utmost precision, such as nuclear physics or astrophysics, F2 class mass standards are indispensable. 2. Metrology Industry In metrology laboratories engaged in testing and maintaining the most advanced measurement standards, F2 class standards are indispensable working tools. 3. High-Precision Testing Laboratories In laboratories specializing in research requiring the highest precision, such as forensic laboratories and materials testing, F2 class mass standards are essential. 4. Aerospace Industry In the precision mass measurements required in the aerospace industry, F2 class standards provide reliability and excellence. F2 class mass standards are the symbol of the highest precision in the field of mass measurement. Their use is crucial in the most advanced fields of science, industry and research.

€18.00 ex VAT
Poland
mass standards
Radwag MA 50/1.X7.A.NS Moisture Analyzer-cover
Radwag MA 50/1.X7.A.NS Moisture Analyzer

MA X7.A moisture analyzers are hi-tech measuring instruments intended for quick determination of rel (more)ative moisture content, dry mass content and other parameters in samples of different substances. MA.X7.A series is equipped with innovative system: the drying chamber can be opened and closed automatically using button or proximity sensors. Such solution allows: Maintaining moisture analyzer clean – operator does not touch moisture analyzer’s housing. Removing any shocks caused by manual closing of the chamber – the chamber closes automatically and always with the same intensity. Achieving high repeatability of opening and closing the drying chamber. Enhancing drying process automation. Enhancing safety of operation by eliminating contact with hot components of drying chamber. Improving operation ergonomics. MA.X7.A series features user-friendly colour touchscreen. Free configuration of the control panel can be done by means of hotkeys, customizable information fields and programmable labels. Drying process can be carried out for any temperature and – thanks to databases – particular drying process may be set for a specific product. Highlights of X7 Series moisture analyzers: Automatic opening and closing of the drying chamber 7” capacitive colour touchpad Modern interface Uncomplicated, intuitive operation Programmable display Drying profiles (standard, mild, step, fast) GLP/GMP printouts-reports Repeatable and customized applications Work optimization due to the use of halogen lamps Capacity and temperature MA.X7.A maximum capacity ranges from 50g/0.1mg to 210g/0.1mg. Moisture content is measured with the 0.01% accuracy (0.001 % for samples bigger than 1.5g). The maximum drying temperature is 160˚C (there is an optional moisture analyzer with 250˚C maximum temperature). An additional element for moisture analyzers that improves their functionality is a water vapour permeability determination set used in tanning industry for determining hygienic properties of leather. Databases: Information system of X7 series moisture analyzers is based on 8 databases, allowing many users to operate product database comprising many samples. Collected measurements may be subjected to subsequent analysis. Collected data is registered in 8 databases: Products (up to 5000 products) Users (up to 100 users) Packaging (up to 100 packagings) Customers (up to 1000 customers) Drying programs (up to 200 drying programs) Drying process reports (up to 5000 drying process reports) Ambient conditions (up to 10000 records) Weighings (up to 50000 records) The results The results obtained using the moisture analyzer (the final result of the drying process): % M – the mass loss in %; displays the mass change recorded during the drying process, expressed as a percentage, % D – the dry mass obtained during the drying process, expressed as a percentage; the result is the portion of the sample that remains on the weighing pan after the moisture has evaporated, % R – the ratio of moisture content to dry mass, obtained during the drying process, expressed as a percentage; the result is the portion of the sample that evaporated during the drying process, g – the sample mass after drying. Interfaces USB interface ensures quick transfer and copying of any results of your work (measurements, reports, databases) to a computer or other moisture analyzer. Remote access to the moisture analyzer allows for online data management. Cooperation with E2R allows for external data management which in turn increases the efficiency and results to the maximum.

€1,936.00 ex VAT
Poland
moisture analysers, balances
People are watching right now:
Radwag 10 μl ÷ 100 μl - RW8-104-20-9 Automatic Pipettes-cover
Radwag 10 μl ÷ 100 μl - RW8-104-20-9 Automatic Pipettes

RADWAG pipettes are modern measuring equipment designed and manufactured in accordance with strict s (more)tandards concerning manufacturing cleanliness and biodegradability of the product. The pipettes represent a new line of the 'liquid handling' product group, designed to quickly measure and transport liquids of small volume. They are characterized by high dosing accuracy and ergonomic, solid design. The pipette mechanism ensures exceptional accuracy and repeatability with reduced pressure on the pipetting button. All the pipettes are inspected for the conformity with the requirements of PN-EN ISO 8655 standard for dosing accuracy and repeatability. Each pipette is delivered with a test report featuring measurements results. The enclosed user manual contains a description of the pipetting techniques as well as verification and adjustment procedures that can be carried out by the user. Calibration certificates, issued by the accredited calibration laboratory are available on request. Features: Large and readable display that is fully visible during pipetting; Innovative soft grip preventing heat transfer to the pipette inside; Low pressure required to use the pipette reduces the risk of RSI; Simple click mechanism for changing the pipette volume; Option of autoclaving the whole pipette (disassembling not required). Recommended autoclaving process: 15 minutes at 121°C temperature, 1.05 bar pressure; Tip ejector collar is made of PVDF which has a high chemical resistance (also at high temperatures) and low susceptibility to microorganisms expansion; Ultra UV resistance; Convenient button for changing the tips; Compatible with most of the tips available on the market.

€160.00 ex VAT
Poland
pipettes calibration, pipettes
Disclaimer: QuestPair assumes no responsibility or liability for any errors or omissions in the content of this site. The information contained in this site is provided and presented on an “as is“ basis with no guarantees of completeness, accuracy, usefulness or timeliness.

Customer Service

Here to help you with: Product Inquiries, Shipping & Support, Technical Support, Business Inquiries and Press.

We are available to assist you Mon-Fri, 10am - 5pm CET.
+31 (0) 73 7114717
[email protected]