Easily list your scientific equipment

Top suppliers for laboratory & industry

New and used instruments

Marketplace
Analytics
Brand
Radwag
Model
PS 1000.5Y Precision Balance
Supplier
Radwag
Location
Radom - Poland
Price
€2,236.00 
(ex. VAT)
This item is
for sale
State of item
new
Categories

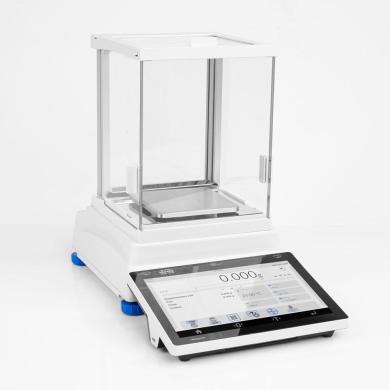
Radwag PS 1000.5Y Precision Balance

Radwag€2,236.00 (ex VAT)
item image

Description by the supplier

Do you need a balance that not only determines weight with impressive accuracy, but also performs a digital audit, responds to your voice commands and sends you light messages?


If so, learn about the functionality of the ELLIPSIS series of balances:


Digital Weighing Auditor


Ensures that your balance is ready for use. It enables air buoyancy compensation in real-time. What is more, it informs about the need for a balance inspection or a periodic audit of the balance’s accuracy and sensitivity.


10-Inch Display


Bigger screen – 10’’ – means more information in one place. On the new ELLIPSIS terminal, you will see up to 3 screens, widgets, graphs, statuses, notes, handy measurement history.


Uncompromising User Verification


For the first time ever, the balance will verify the user using a password,

RFID card, fingerprint reader, facial recognition mechanism, or any combination of these.


Ambient Light – An Innovative Way for the Balance to Communicate With the User


The light colour will tell you about status, process results, procedures, or alerts.


Hotspot


Use the balance on any device connected to it. This can be a smartphone, tablet, or computer.


RFID


ELLIPSIS works with RFID tags* that can be used to tag your products or formulation ingredients in the database. They can also be used to identify a user.


Live Note – Note Down Your Conclusions


It’s the first time you can add a voice memo to a measurement series or procedure report. If you prefer to write it down, ELLIPSIS allows you to add a text note.


Handy Library


This is where a series of recent measurements or a report ready for digital signature, according to 21 CFR Part 11, can be found.


Widgets


Prepared to display what you need most at any given moment.


Smart Min Weight


The balance displays whether the value of the weight you want to weigh is below or above the minimum weight threshold.


21 CFR Part 11


Do you work in the pharmaceutical industry? Do you need a digital signature?


We are offering the laboratory balance which as a standalone fully meets the requirements of

21 CFR Part 11/ EU GMP Annex 11.


- Full data security


- Electronic signatures


- Validations


- Electronic records


- Audit trails


Modbus TCP/IP


is one of the most popular communication protocols in industrial automation. Implementing it in the 5Y balances and CY10 scales makes the devices of this series friendly to automation integrators.


A balance or scale in a Modbus system is a slave device and performs tasks specified by the master device which is most often a PLC. Protocol Modbus TCP/IP in the 5Y balances and C10 scales enables, among other things, the realization of mass readout, zeroing and tare functions of the device, as well as tare settings and MIN and MAX thresholds.


Two-point adjustment


Adjacency, which takes place at two measurement points instead of one, improves measurement precision over the full weighing range. And what does this mean for you? More accurate measurement.


Under-pan weighing


Weighing instruments purchased after 15th February 2023 will allow under-pan weighing at any time after the purchase. All you need to do is just to order a dedicated hook.


* RFID ISO/IEC 14443 Type A, 13.56 MHz

Product details
FunctionsAutotest, Dosing, Percent Weighing, Parts counting, Peak hold, Formulation, Newton unit measurement, Statistics, Checkweighing, IR sensors, Under-pan weighing, GLP Procedures, Animal weighing, Pipettes Calibration, Air density correction, Density determination, Differential weighing, Ambient conditions monitoring, Statistical Quality Control, Packaged Goods Control, ALIBI Memory, Wi-Fi
About QuestPair

QuestPair is a platform to find and acquire laboratory equipment by connecting research organisations, universities, and companies with high-quality, affordable instruments. The platform facilitates multiple sales daily worldwide and works with partners around the globe to provide trusted, vetted products for a wide variety of scientific needs. Our in-house developed AI algorithms collect data on the usage and availability of scientific instruments, enabling us to provide tailor-made assistance in sourcing suitable laboratory equipment. With a focus on cost-effectiveness and sustainability, QuestPair has an excellent track record in streamlining acquisitions for laboratories to further scientific research and development.

Related items:
Explorer EX324 Ohaus-cover
Explorer EX324 Ohaus

The OHAUS Explorer Analytical Balance Series combines innovative functionality and design elements t (more)o deliver unrivalled functionality in a line of high-performance balances that is unique on the market. These are intelligent and intuitive balances, complemented by a series of innovative features that simplify even the most complex laboratory measurements. Applications Weighing, Parts Counting, Percent Weighing, Checkweighing, Animal/Dynamic Weighing, Filling, Totalization/Statistics, Formulation, Differential Weighing, Density Determination, Peak Hold, Ingredient Costing, Pipette Adjustment, SQC Display 5.7" (145 mm) Full-color VGA graphic touchscreen display with user-controlled brightness Operation AC adapter (included) Communication RS232 and USB (included) or second RS232/Ethernet (accessories sold separately) . GLP/GMP data output with real-time clock. Construction Metal base, ABS top housing, stainless steel pan, glass draftshield with top mounted side doors & flip/sliding top door, illuminated up-front level indicator, weigh below hook, security bracket, calibration lock, 4 touchless sensors, in-use cover Design Features Selectable environmental filters, auto tare, user selectable span calibration points, software lockout and reset menu, user selectable communication settings and data print options, user definable project and user IDs, auto standby, up to 14 operating languages Technical features: Internal Calibration: AutoCal™ - Automatic Screen: Included Lid in use: Included Linearity: ±0.0002g Minimum weight according to (USP, 0.1% typical): 0.16g Repeatability (typical): 0.0001 g Stabilization time: 2 s Tare range: to flow by subtraction

€5,265.00 ex VAT
€6,265.35 incl. VAT if applicable
Italy
analytical balances accessories, weighing modules
A&D Weighing ION BM-500 Analytical Balance, 520 g, 0.1 mg-cover
A&D Weighing ION BM-500 Analytical Balance, 520 g, 0.1 mg

A&D Weighing ION BM-500 Analytical Balance, 520 g, 0.1 mg Capacity 520 g Readability 0.1 mg Rep (more)eatability 0.2 mg Features - Easy ION switch allows built-in fan-less internal ionizer to neutralize electrostatically charged objects instantly at no additional costs - Large breeze chamber is flexible enough to adjust to all sample vessels small or large - Anti-static glass coating blocks outside electrical interferences - Auto response adjustment allows balance to auto or manually stabilize FAST, MID, SLOW depending on draft & vibration influences - Built in environmental sensors monitor and display the temperature, humidity and atmospheric pressure - Illuminated back-mounted spirit level bubble helps reduce leveling time and increase accuracy & precision - One touch Full Digital Calibration (internal & external) ensures balance is calibrated onsite for the best performance - Auto Self Calibration will detect changes in ambient temperature and auto calibrate - Data Memory up to 200 points - GLP/GMP/GCP/ISO compliant reports with Manufacturer, Model, Serial, Balance ID, Time/Date, Mass Std, Signature space - Comes standard with USB and RS-232C with Optional Bluetooth and LAN Ethernet Interface with WinCT-Plus software - AD1688 Data Logger hand held device allows storage up to 5,000 pt with time/date and direct output via USB The A&D Weighing ION BM-500 Semi-Micro Analytical Balance offers exceptional precision with a capacity of 520 g and readability of 0.1 mg. It features a built-in fan-less ionizer that neutralizes electrostatic charges instantly, enhancing accuracy without additional costs. The balance's large breeze chamber accommodates various sample vessels, while anti-static glass coating shields against external electrical interferences. Users can tailor response times with automatic or manual stabilization settings (FAST, MID, SLOW) based on environmental disturbances. Integrated sensors continuously track and display temperature, humidity, and atmospheric pressure to maintain optimal conditions. This balance also includes an illuminated spirit level for quick leveling, enhancing accuracy and precision. With one-touch Full Digital Calibration and Auto Self Calibration, it adapts to onsite conditions and ambient temperature changes, ensuring consistent performance. The balance stores up to 200 data points and supports GLP/GMP/GCP/ISO compliant reporting, which includes detailed records such as manufacturer, model, and serial number, alongside calibration and audit details. Additional functionalities include a reverse liquid crystal display, percent weighing, piece counting, and an underhook feature for below-balance weighing. Connectivity options include a standard USB and RS-232C interface, with optional Bluetooth and LAN Ethernet connections via WinCT-Plus software. The AD1688 Data Logger complements this setup by storing up to 5,000 points with time/date stamps for comprehensive data management. A 5-year US warranty guarantees long-term reliability, making the ION BM-500 a superior choice for precise analytical tasks. INCLUDED: The A&D Weighing ION BM-500 Analytical Balance, 520 g, 0.1 mg includes: - AD-1688 Weighing Data Logger - AD-1689 Tweezers - AX-BM-033 Dust Storage Cover - Weighing Pan - Pan Support - Breeze Break Ring - Dust Plate - Power Cord - Operator's Manual - Manufacturer's Documentation - 5 Year Manufacturer's Warranty

$6,714.00 ex VAT
United States
balances, scales
Radwag MWMH 200-3 Electromagnetic Compensation Weighing Module-cover
Radwag MWMH 200-3 Electromagnetic Compensation Weighing Module

MWMH series modules are not offered or distributed in the following countries: Germany, Switzerland, (more) Italy, Japan and the USA. Vast Max Capacity Range Magnetoelectric weighing modules MWMH are intended for mass measurement ranging from 1kg to 10kg. Minimum readability of 0.01g guarantees amazing accuracy for your measurement. Protection Against Challenging Conditions Hermetic versions of modules feature stainless steel housing with IP65 and IP69K. This allows operation even in the most challenging conditions. Mechanical design lacks sharp edges and gaps which ensures adherence to HACCP, GMP and FDA standards for safety and quality of operation. Fast and Precise Measurement High measurement accuracy with sd=1d* guarantees both readout of real weighing results and repeatability of indications. Cutting-edge design solutions provide fast measurement which is an asset allowing to install the module on automated production lines. Intended for fast and dynamic measuring processes the weighing module’s converter throughput is 3200 meas./s. Cooperation with terminals Connecting the module to a multifunctional weighing terminal expands communication interfaces range and increases usage in industrial applications. Mechanical design versions: MWMH xxx - 1 - model with Binder connectors (IP65), MWMH xxx - 2 - model with Binder connectors, (IP65), power supply and control of the transporter on a weighing pan, MWMH xxx - 3 - model with cable glands, (IP 69K), MWMH xxx - 4 - model with cable glands (IP69K), power supply and control of the transporter on a weighing pan MWMH xxx - TWD - model with cable glands (IP 69K).

€6,608.00 ex VAT
Poland
weighing modules
Radwag MA 50/1.X2.IC.A.NS Moisture Analyzer-cover
Radwag MA 50/1.X2.IC.A.NS Moisture Analyzer

MA X2.IC.A moisture analyzers are hi-tech measuring instruments intended for quick determination of  (more)relative moisture content, dry mass content and other parameters in samples of different substances. MA.X2.IC.A series is equipped with innovative system: the drying chamber can be opened and closed automatically using button or proximity sensors. Such solution allows: Maintaining moisture analyzer clean – operator does not touch moisture analyzer’s housing. Removing any shocks caused by manual closing of the chamber – the chamber closes automatically and always with the same intensity. Achieving high repeatability of opening and closing the drying chamber. Enhancing drying process automation. Enhancing safety of operation by eliminating contact with hot components of drying chamber. Improving operation ergonomics. MA.X2.IC.A series features user-friendly colour touchscreen. Free configuration of the control panel can be done by means of hotkeys, customizable information fields and programmable labels. Drying process can be carried out for any temperature and – thanks to databases – particular drying process may be set for a specific product. Highlights of X2 Series moisture analyzers: Automatic opening and closing of the drying chamber 5” capacitive colour touchpad Modern interface Uncomplicated, intuitive operation Programmable display Drying profiles (standard, mild, step, fast) GLP/GMP printouts-reports Repeatable and customized applications Work optimization due to the use of halogen lamps Capacity and temperature MA.X2.IC.A maximum capacity ranges from 50g/0.1mg to 210g/0.1mg. Moisture content is measured with the 0.01% accuracy (0.001 % for samples bigger than 1.5g). The maximum drying temperature is 160˚C (there is an optional moisture analyzer with 250˚C maximum temperature). An additional element for moisture analyzers that improves their functionality is a water vapour permeability determination set used in tanning industry for determining hygienic properties of leather. Databases: Information system of X2 series moisture analyzers is based on 8 databases, allowing many users to operate product database comprising many samples. Collected measurements may be subjected to subsequent analysis. Collected data is registered in 8 databases: Products (up to 5000 products) Users (up to 100 users) Packaging (up to 100 packagings) Customers (up to 1000 customers) Drying programs (up to 200 drying programs) Drying process reports (up to 5000 drying process reports) Ambient conditions (up to 10000 records) Weighings (up to 50000 records) The results The results obtained using the moisture analyzer (the final result of the drying process): % M – the mass loss in %; displays the mass change recorded during the drying process, expressed as a percentage, % D – the dry mass obtained during the drying process, expressed as a percentage; the result is the portion of the sample that remains on the weighing pan after the moisture has evaporated, % R – the ratio of moisture content to dry mass, obtained during the drying process, expressed as a percentage; the result is the portion of the sample that evaporated during the drying process, g – the sample mass after drying. Interfaces USB interface ensures quick transfer and copying of any results of your work (measurements, reports, databases) to a computer or other moisture analyzer. Remote access to the moisture analyzer allows for online data management. Cooperation with E2R allows for external data management which in turn increases the efficiency and results to the maximum.

€2,058.00 ex VAT
Poland
balances, moisture analysers
People are watching right now:
Radwag F1 Mass Standard - Stainless Steel Wire -2 mg-cover
Radwag F1 Mass Standard - Stainless Steel Wire -2 mg

F1 class mass standards are exceptional measuring tools that represent the pinnacle of precision in  (more)the field of metrology. Classified as F1 metrology class, they are perfect for advanced applications where every detail of measurement is of paramount importance. F1 class standard: stainless steel wire Nominal value: 2 mg Material: stainless steel Highest Precision and Accuracy F1 class mass standards are characterized by absolute measurement precision and extraordinary accuracy. They are designed to meet the most stringent standards for acceptable deviation from actual weight. Stability under Difficult Conditions An important feature of F1 class mass standards is their ability to maintain measurement stability even under harsh environmental conditions. The standards of this class are resistant to changes in temperature, humidity and other factors that affect the precision of measurements. Calibration in Accordance with International Standards The calibration process for F1-class mass standards is rigorous and in accordance with international standards. This ensures that standards of this class are globally recognized and can be used in different countries. Specialized Construction Materials F1-class standards are often made of materials with unique physical properties. This provides them not only with precision, but also with durability and wear resistance. Applications 1. Industrial Metrology F1 class mass standards are used in metrology laboratories engaged in the testing and maintenance of measurement standards. 2. Scientific Research In scientific research, especially in high-precision fields such as physics and astronomy, F1-class mass standards are a key tool. 3. Aerospace Industry In the precision mass measurements required by the aerospace industry, F1-class standards guarantee reliability and accuracy. 4. Calibration Laboratories In calibration laboratories where uniformity and precision are a priority, F1-class mass standards are the standard of excellence. F1-class mass standards are synonymous with the highest quality and precision in the field of metrology. Their use is crucial where even the slightest deviation from the standard can carry unpleasant consequences. They are tools for advanced applications that contribute to raising standards in the field of mass measurement.

€38.00 ex VAT
Poland
mass standards
Motic BA310 MET-T Trinocular  (Stroke 6 x 4 Stage)-cover
Motic BA310 MET-T Trinocular (Stroke 6 x 4 Stage)

Motic BA310 MET-T Trinocular (Stroke 6”x 4” Stage) Motic’s BA310MET series presents a powerful micro (more)scope line for incident light applications in all material sciences. Industrial quality control of opaque samples can be performed as well as teaching in educational environments of engineering and material professions, where affordability and ease of use are key demands. Extended flexibility is given by the BA310MET-T models with built-in transmitted light for transparent or compound materials. The BA310MET-H includes a more flexible focusing device, dedicated to larger samples with little limitation in size. Motic's LM Plan-Achromatic objectives with Long-Working Distance for incident light provide optimal image contrast for reflective, non-covered specimen. Together with a fully corrected tube lens an intermediate image without colored fringes is created. In all models the Epi-Illuminator offers a powerful 50W Halogen light source. The built-in field diaphragm and aperture diaphragm help to optimize image quality by reducing stray light and thus increasing contrast.INCLUDED: The Motic BA310 MET-T Trinocular (Stroke 6”x 4” Stage) includes: - 5X/0.13 (WD 20.3mm) Objective - 10X/0.25 (WD 17.5mm) Objective - 20X/0.40 (WD 8.1mm) Objective - 50X/0.55 (WD 8.4mm) Objective - Widefield N-WF10X/20mm with Diopter Adjustment - Dust Cover - Power Cord - Allen Key - Blue, Frosted, Green and Yellow Filters - Operator's Guide Motic BA310 MET-T Trinocular (Stroke 6”x 4” Stage) SpecificationsModelBA310MET-H Trinocular (6"x4")Optical systemColour Corrected Infinity Optical System (CCIS®)Observation tubeTrinocular head, Siedentopf type, 360° SwivelingInclination30° inclinedTrinocular light split100:0/20:80Interpupillary distance48-75mmDiopter adjustmentOn both eyepieces, +/- 5 diopterEyepiecesWidefield N-WF10X/20mm with diopter adjustmentIntermediate bodyEpi-illuminator quartz halogen with integrated field and aperture diaphragms and external lamphouseNosepieceReversed quintupleObjective classificationCCIS® LM Plan Achromatic, DINObjectives5X/0.13 (WD 20.3mm), 10X/0.25 (WD 17.5mm), 20X/0.40 (WD 8.1mm), 50X/0.55 (WD 8.4mm)Objective mounting threadW 4/5"x1/36" (RMS standard)Stand typeUprightStageMechanical stage, hard coated with built-in low position coaxial stage control and glass plateStage size300x180mmTravel range X&Y150x100mm (6"x4")CondenserFocusable and centerable Abbe condenser N.A. 0.85DiaphragmIris diaphragmFocus mechanismCoaxial coarse and fine focusing system with tension adjustmentFine focus precision2μmFocusing stroke30mmUpper limit stopUpper limit stop preset but adjustableFilter holderOn top of the illuminator with fixing capIncident illuminationQuartz halogen 12V/50W with integrated field and aperture diaphragmsTransmitted illuminationKoehler Quartz halogen 6V/30W with intensity controlIllumination interchangeabilityEpi-illuminator Quartz halogen 12V/50W or LED 3W, transmitted Quartz halogen 6V/30W or LED 3WIllumination featuresExternal lamp house for Epi-illuminatorTransformerEpi-illuminator external, transmitted internalPower supply100-240V (CE)Dimensions LxWxH508x240x465mmNet weight12.7kgComparison of ModelsSpecificationMotic BA310 MET BinocularMotic BA310 MET TrinocularMotic BA310 MET-H TrinocularMotic BA310 MET-H Trinocular (Erect Image)Motic BA310 MET-T Trinocular (3"x2" Stage)Motic BA310 MET-T Trinocular (6"x4" Stage)Motic BA310 MET-T Trinocular (Erect Image)Motic BA310 MET-T Trinocular (Stroke 3”x 2” Stage) (Erect Image)Observation TubeBinocular headTrinocular headTrinocular headTrinocular head (Erect Image)Trinocular head, Siedentopf type, 360° SwivelingTrinocular head, Siedentopf type, 360° SwivelingTrinocular head, Siedentopf type, 360° SwivelingTrinocular head, Siedentopf type, 360° SwivelingInterpupillary Distance48-75mm48-75mm55-75mm55-75mm48-75mm48-75mm48-75mm48-75mmObjective ClassificationCCIS® EC Plan Achromatic, DINCCIS® EC Plan Achromatic, DINCCIS® LM Plan Achromatic, DINCCIS® LM Plan Achromatic, DINCCIS® LM Plan Achromatic, DINCCIS® LM Plan Achromatic, DINCCIS® EC Plan Achromatic, DINCCIS® LM Plan Achromatic, DINObjectives5X/0.13 (WD 20.3mm), 10X/0.25 (WD 17.5mm), 20X/0.40 (WD 8.1mm), 50X/0.55 (WD 8.4mm)5X/0.13 (WD 20.3mm), 10X/0.25 (WD 17.5mm), 20X/0.40 (WD 8.1mm), 50X/0.55 (WD 8.4mm)5X/0.13 (WD 11.5mm), 10X/0.3 (WD 6.8mm), 20X/0.40 (WD 11.1mm), 50X/0.55 (WD 8.2mm)5X/0.13 (WD 20.3mm), 10X/0.25 (WD 17.5mm), 20X/0.40 (WD 8.1mm), 50X/0.55 (WD 8.4mm)5X/0.13 (WD 20.3mm), 10X/0.25 (WD 17.5mm), 20X/0.40 (WD 8.1mm), 50X/0.55 (WD 8.4mm)5X/0.13 (WD 20.3mm), 10X/0.25 (WD 17.5mm), 20X/0.40 (WD 8.1mm), 50X/0.55 (WD 8.4mm)5X/0.13 (WD 20.3mm), 10X/0.25 (WD 17.5mm), 20X/0.40 (WD 8.1mm), 50X/0.55 (WD 8.4mm)5X/0.13 (WD 20.3mm), 10X/0.25 (WD 17.5mm), 20X/0.40 (WD 8.1mm), 50X/0.55 (WD 8.4mm)StageMechanical stage, hard coated with coaxial stage controlMechanical stage, hard coated with coaxial stage controlMechanical stage, hard coated with coaxial stage controlMechanical stage, hard coated with coaxial stage controlMechanical stage, hard coated with built-in low position coaxial stage control and glass plateMechanical stage, hard coated with built-in low position coaxial stage control and glass plateMechanical stage, hard coated with built-in low position coaxial stage controlMechanical stage, hard coated with built-in low position coaxial stage control and glass plateStage Size180x140mm180x140mm180x140mm180x140mm240x140mm300x180mm180x140mm240x140mmTravel Range X&Y75x50mm75x50mm100x80mm100x80mm75x50mm150x100mm75x50mm75x50mmIllumination InterchangeabilityQuartz halogen 12V/50W or LED 3WQuartz halogen 12V/50W or LED 3WQuartz halogen 12V/50W or LED 3WQuartz halogen 12V/50W or LED 3WEpi-illuminator Quartz halogen 12V/50W or LED 3W, transmitted Quartz halogen 6V/30W or LED 3WEpi-illuminator Quartz halogen 12V/50W or LED 3W, transmitted Quartz halogen 6V/30W or LED 3WQuartz halogen 12V/50W or LED 3WEpi-illuminator Quartz halogen 12V/50W or LED 3W, transmitted Quartz halogen 6V/30W or LED 3W.comparison-table tr td:nth-child(7) { background-color: #fffacd; }DownloadsTechnical Specification Download Operator's Manual Download

$4,441.00 ex VAT
United States
general laboratory equipment other
Disclaimer: QuestPair assumes no responsibility or liability for any errors or omissions in the content of this site. The information contained in this site is provided and presented on an “as is“ basis with no guarantees of completeness, accuracy, usefulness or timeliness.

Customer Service

Here to help you with: Product Inquiries, Shipping & Support, Technical Support, Business Inquiries and Press.

We are available to assist you Mon-Fri, 10am - 5pm CET.
+31 (0) 73 7114717
[email protected]