Easily list your scientific equipment

Top suppliers for laboratory & industry

New and used instruments

Marketplace
Analytics
Brand
Radwag
Model
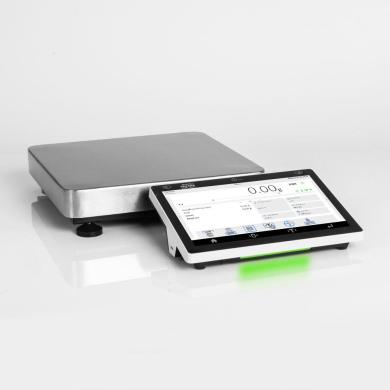
CY10.12/30.F1.K Precision Balance
Supplier
Radwag
Location
Radom - Poland
Price
€1,848.00 
(ex. VAT)
This item is
for sale
State of item
new
Categories

Radwag CY10.12/30.F1.K Precision Balance

Radwag€1,848.00 (ex VAT)
item image

Description by the supplier

Precision in PRO version


The CY10 series precision balance is designed for fast, accurate and repeatable weight determination. It comes with an advanced PUE CY10 terminal, and that means working comfort with a 10-inch high-resolution display with a smooth and intuitive interface.


Software for special tasks


Thanks to the terminal advanced software, the CY10 series precision balance:


Cooperates with up to 2 weighing platforms


Continuously updates all statistical data after the next measurement is entered into the balance’s memory – either globally (regardless of the weighed commodity) or separately for each weighed commodity selected from the database


Has a Tare mode expanded to include End-product issue mode capability


Works with RFID tags* (accessing personal data as well as marking specific goods or recipe ingredients in the database).


Precision balance and labelling scale in one device


If you need a labeling scale, the CY10 is the perfect solution. With a terminal that:


Cooperates with the computer program Label Editor R02


Is compatible with ZEBRA label printers


Supports single labels, bulk labels and bulk from bulk labels


Allows import/ export of label designs using a pendrive


Enables you to assign labels to goods or customers and print a global label


The CY10 series precision balance can operate as a labeling scale.


Light or dark?


Which color theme will you set on your CY10 balance? Both are user-friendly and clear, but we are curious which one you like more.


Modbus TCP/IP


is one of the most popular communication protocols in industrial automation. Implementing it in the

5Y balances and CY10 scales

makes the devices of this series friendly to automation integrators.


A balance or scale in a Modbus system is a slave device and performs tasks specified by the master device which is most often a PLC.

Protocol Modbus TCP/IP

in the 5Y balances and C10 scales enables, among other things, the

realization of mass readout, zeroing and tare functions of the device, as well as tare settings and MIN and MAX thresholds.


* RFID ISO/IEC 14443 Type A, 13,56 MHz

Product details
FunctionsAutotest, Dosing, Percent Weighing, Parts counting, Peak hold, Formulation, Newton unit measurement, Statistics, Checkweighing, IR sensors, GLP Procedures, Animal weighing, Pipettes Calibration, Air density correction, Density determination, Differential weighing, Ambient conditions monitoring, Statistical Quality Control, Packaged Goods Control, ALIBI Memory, Wi-Fi
About QuestPair

QuestPair is a platform to find and acquire laboratory equipment by connecting research organisations, universities, and companies with high-quality, affordable instruments. The platform facilitates multiple sales daily worldwide and works with partners around the globe to provide trusted, vetted products for a wide variety of scientific needs. Our in-house developed AI algorithms collect data on the usage and availability of scientific instruments, enabling us to provide tailor-made assistance in sourcing suitable laboratory equipment. With a focus on cost-effectiveness and sustainability, QuestPair has an excellent track record in streamlining acquisitions for laboratories to further scientific research and development.

Related items:
Radwag MA 200/1.X2.A Moisture Analyzer-cover
Radwag MA 200/1.X2.A Moisture Analyzer

MA X2.A moisture analyzers are hi-tech measuring instruments intended for quick determination of rel (more)ative moisture content, dry mass content and other parameters in samples of different substances. MA.X2.A series is equipped with innovative system: the drying chamber can be opened and closed automatically using button or proximity sensors. Such solution allows: Maintaining moisture analyzer clean – operator does not touch moisture analyzer’s housing. Removing any shocks caused by manual closing of the chamber – the chamber closes automatically and always with the same intensity. Achieving high repeatability of opening and closing the drying chamber. Enhancing drying process automation. Enhancing safety of operation by eliminating contact with hot components of drying chamber. Improving operation ergonomics. MA.X2.A series features user-friendly colour touchscreen. Free configuration of the control panel can be done by means of hotkeys, customizable information fields and programmable labels. Drying process can be carried out for any temperature and – thanks to databases – particular drying process may be set for a specific product. Highlights of X2 Series moisture analyzers: Automatic opening and closing of the drying chamber 5” capacitive colour touchpad Modern interface Uncomplicated, intuitive operation Programmable display Drying profiles (standard, mild, step, fast) GLP/GMP printouts-reports Repeatable and customized applications Work optimization due to the use of halogen lamps Capacity and temperature MA.X2.A maximum capacity ranges from 50g/0.1mg to 210g/0.1mg. Moisture content is measured with the 0.01% accuracy (0.001 % for samples bigger than 1.5g). The maximum drying temperature is 160˚C (there is an optional moisture analyzer with 250˚C maximum temperature). An additional element for moisture analyzers that improves their functionality is a water vapour permeability determination set used in tanning industry for determining hygienic properties of leather. Databases: Information system of X2 series moisture analyzers is based on 8 databases, allowing many users to operate product database comprising many samples. Collected measurements may be subjected to subsequent analysis. Collected data is registered in 8 databases: Products (up to 5000 products) Users (up to 100 users) Packaging (up to 100 packagings) Customers (up to 1000 customers) Drying programs (up to 200 drying programs) Drying process reports (up to 5000 drying process reports) Ambient conditions (up to 10000 records) Weighings (up to 50000 records) The results The results obtained using the moisture analyzer (the final result of the drying process): % M – the mass loss in %; displays the mass change recorded during the drying process, expressed as a percentage, % D – the dry mass obtained during the drying process, expressed as a percentage; the result is the portion of the sample that remains on the weighing pan after the moisture has evaporated, % R – the ratio of moisture content to dry mass, obtained during the drying process, expressed as a percentage; the result is the portion of the sample that evaporated during the drying process, g – the sample mass after drying. Interfaces USB interface ensures quick transfer and copying of any results of your work (measurements, reports, databases) to a computer or other moisture analyzer. Remote access to the moisture analyzer allows for online data management. Cooperation with E2R allows for external data management which in turn increases the efficiency and results to the maximum.

€3,668.00 ex VAT
Poland
moisture analysers, balances
Ohaus EX224/AD Explorer Analytical Balance-cover
Ohaus EX224/AD Explorer Analytical Balance

Ohaus EX224/AD Explorer Analytical Balance Introducing the OHAUS EX224/AD Explorer Balance: high-per (more)formance laboratory equipment that redefines the standard for analytical balances. This top-tier balance is part of the OHAUS Explorer Series, a unique line that seamlessly combines modern features with an intelligent design, promising to simplify even the most complex laboratory measurements.The EX224/AD Explorer Balance stands out with its large color touchscreen, providing intuitive navigation and convenient access to the system's advanced application modes. It has an icon-driven application software that includes features such as user management, a comprehensive library, and a minimum weight indication. These smart features make the balance not just a tool but a helpful assistant in your laboratory work.The Explorer Balance prioritizes accuracy with its fast stabilization times, optimized linearity, and excellent repeatability specifications. It includes enhanced vibration filtering, which guarantees precise results under different working conditions. Another standout feature is the AutoCal™ calibration system, ensuring the accuracy of your measurements is maintained over time and across a wide range of environmental conditions.The EX224/AD model incorporates an ingenious draftshield that offers easy entry to the weighing chamber. This draftshield can be accessed through a flip or sliding top door and the top-mounted side doors. Notably, these doors can be automatically controlled in /AD models, offering additional convenience and efficiency to your weighing process.Discover the future of laboratory measurements with the OHAUS EX224/AD Explorer Balance, a high-performance balance that offers unmatched functionality, ensuring precise and reliable results every time.INCLUDED: The Ohaus EX224/AD Explorer Analytical Balance includes: - Power Cord - One Year Manufacturer's Warranty

$5,262.00 ex VAT
United States
balances, scales
People are watching right now:
Radwag F1 Mass Standard - Flat Polygonal Sheet - 1 mg-cover
Radwag F1 Mass Standard - Flat Polygonal Sheet - 1 mg

F1 class mass standards are exceptional measuring tools that represent the pinnacle of precision in  (more)the field of metrology. Classified as F1 metrology class, they are perfect for advanced applications where every detail of measurement is of paramount importance. F1 mass standard: flat polygonal sheet Nominal value: 1 mg Material: aluminum F1 Class Mass Standards – Key Features Highest Precision and Accuracy - F1 class mass standards are characterized by absolute measurement precision and extraordinary accuracy. They are designed to meet the most stringent standards for acceptable deviation from actual weight. Stability under Difficult Conditions - An important feature of F1 class mass standards is their ability to maintain measurement stability even under harsh environmental conditions. The standards of this class are resistant to changes in temperature, humidity and other factors that affect the precision of measurements. Calibration in Accordance with International Standards - The calibration process for F1-class mass standards is rigorous and in accordance with international standards. This ensures that standards of this class are globally recognized and can be used in different countries. Specialized Construction Materials - F1-class standards are often made of materials with unique physical properties. This provides them not only with precision, but also with durability and wear resistance. Application 1. Industrial Metrology F1 class mass standards are used in metrology laboratories engaged in the testing and maintenance of measurement standards. 2. Scientific Research In scientific research, especially in high-precision fields such as physics and astronomy, F1-class mass standards are a key tool. 3. Aerospace Industry In the precision mass measurements required by the aerospace industry, F1-class standards guarantee reliability and accuracy. 4. Calibration Laboratories In calibration laboratories where uniformity and precision are a priority, F1-class mass standards are the standard of excellence. F1-class mass standards are synonymous with the highest quality and precision in the field of metrology. Their use is crucial where even the slightest deviation from the standard can carry unpleasant consequences. They are tools for advanced applications that contribute to raising standards in the field of mass measurement.

€18.00 ex VAT
Poland
mass standards
Scilogex MicroPette Plus Pipettor, Starter Kit-1. 0.5-10ul, 2-20ul, 20-200ul, 100-1000ul & Linear Stand-cover
Scilogex MicroPette Plus Pipettor, Starter Kit-1. 0.5-10ul, 2-20ul, 20-200ul, 100-1000ul & Linear Stand

Scilogex MicroPette Plus Pipettor, Starter Kit-1. 0.5-10ul, 2-20ul, 20-200ul, 100-1000ul & Linea (more)r Stand The MicroPette Plus pipettes are fully autoclavable, enable easy cleaning and reduce the risk of contamination. Steam autoclaving can be performed at 121°C, 1 bar for 20 minutes. After autoclaving, the pipette must be cooled down and left to dry for 12 hours before use. It is recommended to check the performance of the pipette after each autoclaving. Greasing and sealing of the pipette piston after every 10th autoclaving will secure an enhanced function.CalibrationAll SCILOGEX pipettes have been quality tested according to ISO8655-2:2002 and are supplied with individual calibration certificates. The quality control includes gravimetric testing of each pipette with distilled water at 22°C.Product Features - Lightweight and ergonomic design - Fully autoclavable - Clear digital display - Staggered tip ejector for easy tip ejection - Head rotates 360° for user comfort. - Easy to calibrate with tool supplied. - Used with 'universal' pipette tips. - Dispensing head rotates for effortless pipetting convenience. - Individual piston and tip cone assembly allow for easy repair and maintenance - Compound material-made tip cone secures high sealing performance - Compatible with most universal tip brands INCLUDED: The Scilogex MicroPette Plus Pipettor, Starter Kit-1. 0.5-10ul, 2-20ul, 20-200ul, 100-1000ul & Linear Stand includes: - Two Year Manufacturer's Warranty

$343.00 ex VAT
United States
general laboratory equipment other
Disclaimer: QuestPair assumes no responsibility or liability for any errors or omissions in the content of this site. The information contained in this site is provided and presented on an “as is“ basis with no guarantees of completeness, accuracy, usefulness or timeliness.

Customer Service

Here to help you with: Product Inquiries, Shipping & Support, Technical Support, Business Inquiries and Press.

We are available to assist you Mon-Fri, 10am - 5pm CET.
+31 (0) 73 7114717
[email protected]