Easily list your scientific equipment

Top suppliers for laboratory & industry

New and used instruments

Marketplace
Analytics
Brand
Radwag
Model
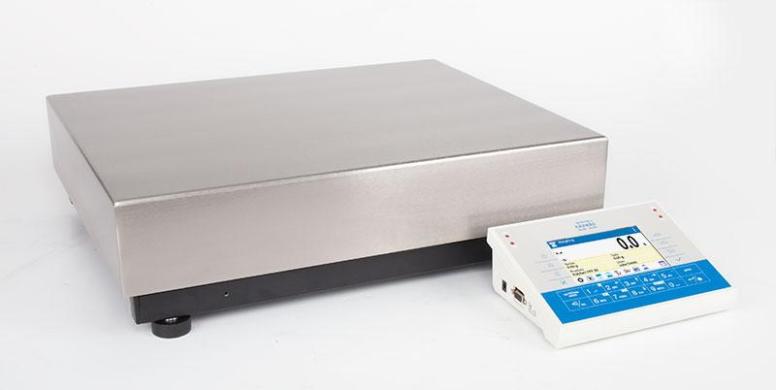
C32.120.PM Precision Balance
Supplier
Radwag
Location
Radom - Poland
Price
€4,884.00 
(ex. VAT)
This item is
for sale
State of item
new
Categories

Radwag C32.120.PM Precision Balance

Radwag€4,884.00 (ex VAT)
item image

Description by the supplier

PM Balances by RADWAG – Laboratory Precision Under Industrial Conditions


Mono BLOCK® technology


The ability to weigh loads up to 120 kg on a large weighing pan with high accuracy and good repeatability,


minimum eccentricity error over the entire range,


quick and stable measurement (achievable within 1 second),


parameter stability over time and during transport,


weighing pan dimensions adapted to the accuracy of the balance


are the distinguishing features of RADWAG PM balances. All of this is possible thanks to the use of a cutting-edge measuring system based on RADWAG’s enhanced MonoBLOCK® technology.


The change in the design of the monoblock has made it possible to work with a readability of 0.01 g at a maximum capacity of 20 kg and 0.2 g at a maximum capacity of 120 kg, with a repeatability of 0.01 g, and resistance to changes in ambient conditions.


PM balances also include:


robust design based on a larger and taller Monoblock,


built-in 4-point overload protection system,


IP 43 ingress protection,


internal adjustment,


5" colour display,


easy start-up, intuitive operation, and ergonomics.


Application


PM balances not only provide an accurate reading and quick measurement, but they are also versatile, allowing them to be used in a variety of industrial sectors.


Dosing, formulation-making, and parts counting are just some of the possible applications of these multi-purpose devices.


PM balances will find use wherever high-accuracy, high-load-capacity weighing equipment is required.


THBR 2.0 System


Cooperation with THBR 2.0 System for ambient conditions monitoring.

Product details
FunctionsLabelling, Plus/Minus Control, Percent Weighing, Totalizing, Parts counting, Newton unit measurement, Statistics, IR sensors, GLP Procedures, Animal weighing, Density determination, Replaceable unit, ALIBI Memory
About QuestPair

QuestPair is a platform to find and acquire laboratory equipment by connecting research organisations, universities, and companies with high-quality, affordable instruments. The platform facilitates multiple sales daily worldwide and works with partners around the globe to provide trusted, vetted products for a wide variety of scientific needs. Our in-house developed AI algorithms collect data on the usage and availability of scientific instruments, enabling us to provide tailor-made assistance in sourcing suitable laboratory equipment. With a focus on cost-effectiveness and sustainability, QuestPair has an excellent track record in streamlining acquisitions for laboratories to further scientific research and development.

Related items:
Radwag F1 Mass Standard - Stainless Steel Wire -500 mg-cover
Radwag F1 Mass Standard - Stainless Steel Wire -500 mg

F1 class mass standards are exceptional measuring tools that represent the pinnacle of precision in  (more)the field of metrology. Classified as F1 metrology class, they are perfect for advanced applications where every detail of measurement is of paramount importance. F1 class standard: stainless steel wire Nominal value: 500 mg Material: stainless steel Highest Precision and Accuracy F1 class mass standards are characterized by absolute measurement precision and extraordinary accuracy. They are designed to meet the most stringent standards for acceptable deviation from actual weight. Stability under Difficult Conditions An important feature of F1 class mass standards is their ability to maintain measurement stability even under harsh environmental conditions. The standards of this class are resistant to changes in temperature, humidity and other factors that affect the precision of measurements. Calibration in Accordance with International Standards The calibration process for F1-class mass standards is rigorous and in accordance with international standards. This ensures that standards of this class are globally recognized and can be used in different countries. Specialized Construction Materials F1-class standards are often made of materials with unique physical properties. This provides them not only with precision, but also with durability and wear resistance. Applications 1. Industrial Metrology F1 class mass standards are used in metrology laboratories engaged in the testing and maintenance of measurement standards. 2. Scientific Research In scientific research, especially in high-precision fields such as physics and astronomy, F1-class mass standards are a key tool. 3. Aerospace Industry In the precision mass measurements required by the aerospace industry, F1-class standards guarantee reliability and accuracy. 4. Calibration Laboratories In calibration laboratories where uniformity and precision are a priority, F1-class mass standards are the standard of excellence. F1-class mass standards are synonymous with the highest quality and precision in the field of metrology. Their use is crucial where even the slightest deviation from the standard can carry unpleasant consequences. They are tools for advanced applications that contribute to raising standards in the field of mass measurement.

€38.00 ex VAT
Poland
mass standards
Radwag XA100 - Adapter for Pipettes calibration 100 ml XA 5Y-cover
Radwag XA100 - Adapter for Pipettes calibration 100 ml XA 5Y

XA100 pipette calibration adapter enables calibration and/or verification of piston pipettes by mean (more)s of a gravimetric method using the XA analytical balence. Set content: base weighing pan weighing vessel evaporation ring glass chamber with an opening for dosing Evaporation ring is an integral part of the adapter that increases relative humidity inside the weighing chamber. With this evaporation of the liquid during calibration/verification is stopped. An integrated weighing pan enables centric loading of the vessel in the weighing chamber. The weighing pan and the vessel are housed in a glass chamber featuring an opening allowing the user to dispense liquid through it, and reducing air drafts. Vessel capacity: 100 ml Adapters for Pipettes Calibration Pipette calibration adapters are intended for calibration and verification of piston pipettes using gravimetric method. Use of the pipette calibration adapter reduces maximum capacity of the balance by the mass of the weighing vessel. The table below, which presents the minimum requirements in accordance with ISO 8655-6:2022 standard, enables to select suitable adapter for pipette calibration and respective balance version. The parameters of the balance have been selected so that the expanded uncertainty of measurement in use is less than ¼ of the maximum permissible error of the test object. Nominal volume of apparatus under test V Resolution (d) mg Repeatability (s)3mg Recommended balance Microbalances Analytical balances 0,5 µl ≤ V < 20 µl 0,001c 0,01d 0,006c, e 0,03d MYA 21.5Y XA 6/21.5Y.M.A XA 6/21.5Y.M XA 21.5Y.M.A XA 21.5Y.M XA 21/52.5Y.M.A XA 21/52.5Y.M XA 53.5Y.M.A XA 53.5Y.M 20 µl ≤ V < 200 µl 0,01 0,025 XA 52.5Y XA 110.5Y XA 82/220.5Y.A XA 82/220.5Y XA 120/250.5Y.A XA 120/250.5Y 200 µl ≤ V ≤ 10 ml 0,1 0,2 Adapter for pipette calibration MY 11 XA 11 XA 11 XA 11 XA 11 XA 17 XA 17 XA 17 XA 100 XA 17 XA 100 Maximum vessel capacity 11 ml 11 ml 11 ml 11 ml 11 ml 17 ml 17 ml 17 ml 100 ml 17 ml 100 ml Weighing vessel mass ~ 10 g ~ 10 g ~ 10 g ~ 10 g ~ 10 g ~ 11 g ~ 11 g ~ 11 g ~ 65 g ~ 11 g ~ 65 g a The repeatability values, in this table, apply in the volumen determination of a single channel pipette. When a single-channel balance is used for volumen determination of single channel pipettes the repeatability values are double the values of this table. c Single-channel balance. d Multichannel balance, only valid for multi-channel pipettes. Multi-channel balances of 0,01 mg readability may be uses to test multi-channel pipettes with nominla volumes below 20 µl only if the expanded uncertainty in use is less than ¼ of the maximum permissible systematic error of the test object. e For single-channel pipettes of nominal volumes of less than 2 µl, a balance with repeatability better than the values in the table shall be used so that the expanded uncertainty in use is less than ¼ of the maximum permissible systematic error of the test object. table {font-size: 12px} td {padding:10px; } tr {text-align:center;} @media (max-width: 800px) { table {font-size: 9px} td {padding: 1px 1px} }

€1,108.00 ex VAT
Poland
ultra microbalances, pipettes calibration, analytical balances, analytical balances accessories, balances, balances accessories, microbalances, microbalances accessories, pipettes, scales, ultra & microbalances accessories
Radwag MWMH 500-1 Electromagnetic Compensation Weighing Module-cover
Radwag MWMH 500-1 Electromagnetic Compensation Weighing Module

MWMH series modules are not offered or distributed in the following countries: Germany, Switzerland, (more) Italy, Japan and the USA. Vast Max Capacity Range Magnetoelectric weighing modules MWMH are intended for mass measurement ranging from 1kg to 10kg. Minimum readability of 0.01g guarantees amazing accuracy for your measurement. Protection Against Challenging Conditions Hermetic versions of modules feature stainless steel housing with IP65 and IP69K. This allows operation even in the most challenging conditions. Mechanical design lacks sharp edges and gaps which ensures adherence to HACCP, GMP and FDA standards for safety and quality of operation. Fast and Precise Measurement High measurement accuracy with sd=1d* guarantees both readout of real weighing results and repeatability of indications. Cutting-edge design solutions provide fast measurement which is an asset allowing to install the module on automated production lines. Intended for fast and dynamic measuring processes the weighing module’s converter throughput is 3200 meas./s. Cooperation with terminals Connecting the module to a multifunctional weighing terminal expands communication interfaces range and increases usage in industrial applications. Mechanical design versions: MWMH xxx - 1 - model with Binder connectors (IP65), MWMH xxx - 2 - model with Binder connectors, (IP65), power supply and control of the transporter on a weighing pan, MWMH xxx - 3 - model with cable glands, (IP 69K), MWMH xxx - 4 - model with cable glands (IP69K), power supply and control of the transporter on a weighing pan MWMH xxx - TWD - model with cable glands (IP 69K).

€5,084.00 ex VAT
Poland
weighing modules
Radwag M1 Mass Standard - Flat Polygonal Sheet - 500 mg-cover
Radwag M1 Mass Standard - Flat Polygonal Sheet - 500 mg

Class M1 mass standards are versatile measuring tools characterized by their high precision and vers (more)atility in laboratory, industrial or commercial applications. Classified as M1 metrology class, they are valued for their versatility and accuracy in mass measurement. M1 mass standard: flat polygonal sheet Nominal value: 500 mg Material: nickel silver M1 Class Mass Standards – Key Features High-Level Precision - M1 class mass standards are designed to ensure precision in mass measurements. Permissible deviations from the actual mass are set with strict standards. Versatility of Applications - Characterized by versatility, M1-class standards are used in fields such as laboratories, industry, commerce and other areas requiring precise weight measurements. Measurement Stability - M1-class mass standards are stable over time, meaning that they maintain their measurement precision even despite prolonged use. This feature is especially important for tools that are used regularly. Operation in a Wariety of Ambient Conditions - M1 class mass standards are designed to cope with both laboratory, industrial and commercial conditions. Application 1. Analytical Laboratories In analytical laboratories where precise measurements are crucial, Class M1 mass standards are used to calibrate medium-precision balances. 2. Manufacturing Industry In the manufacturing industry, where product quality control is important, M1 class mass standards can be used to calibrate balances used in the manufacturing process. 3. Weighing Trade In the weighing trade, where measurement precision is required by law, M1 class mass standards can be used as a reference for calibrating commercial balances. 4. Testing Laboratories In research laboratories, Class M1 mass standards can be used to ensure precise weight measurements. Class M1 mass standards are versatile tools that are used in various areas of life. Their ability to adapt to different conditions makes this class of standards highly valued in the world of science, industry and commerce alike.

€10.00 ex VAT
Poland
mass standards
People are watching right now:
Disclaimer: QuestPair assumes no responsibility or liability for any errors or omissions in the content of this site. The information contained in this site is provided and presented on an “as is“ basis with no guarantees of completeness, accuracy, usefulness or timeliness.

Customer Service

Here to help you with: Product Inquiries, Shipping & Support, Technical Support, Business Inquiries and Press.

We are available to assist you Mon-Fri, 10am - 5pm CET.
+31 (0) 73 7114717
[email protected]