Easily list your scientific equipment

Top suppliers for laboratory & industry

New and used instruments

Marketplace
Analytics
Brand
Ohaus
Supplier
Marshall Scientific
Location
Hampton - United States
Price
$3,007.00 
(ex. VAT)
This item is
for sale
State of item
new
Categories

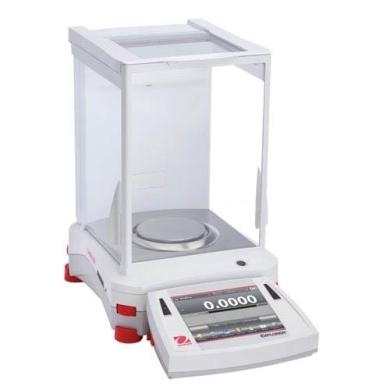
Ohaus EX223 Explorer Toploading Balance, 220 g, 0.001 g

Marshall Scientific$3,007.00 (ex VAT)
item image

Description by the supplier

Ohaus EX223 Explorer Toploading BalanceThe OHAUSEX223 Explorer Precision Balance with 220 gram weight capacity, has newlyoptimized linearity and repeatability specifications and enhanced vibrationfiltering for better balance stability. All Explorer models also come standardwith AutoCal automatic internal calibration. These combined enhancementsimprove accuracy, efficiency, and throughput.A large colortouch-screen display, icon-driven application software that features 14 uniqueapplication modes, and an adjustable angle display make the OHAUS Explorerseries the easiest to use, most advanced balance in its class today.The base andterminal of the Explorer EX223 separate for maximum flexibility in any workarea. It also has four user-programmable touch free sensors to minimize crosscontamination and button wear. The EX223 meet or exceed the Class I and IIaccuracy requirements in accordance with the National Institute of Standardsand Technology (NIST) Handbook.

220g Capacity

0.001g Readability

Platform: 130mm

Large 5.7" full-color touchscreen display with intuitive set-up and application software

AutoCal automatic internal calibration for optimized weighing performance

14 application modes, 11 weighing units and 5 display languages for a wide variety of applications

4 programmable touchless sensors for hands-free operation

Modular display can be separated from the weighing base

Frameless draftshield with anti-static glass, flip-top and large side entry doors on top-mounted bearings


Click Here to View Product Video


INCLUDED:

The Ohaus EX223 Explorer Toploading Balance includes:

- Power Cord

- Operator's Guide

- Manufacturer's Documentation

- 1 Year Manufacturer's Warranty

Product details
Maximum Capacity220 g
Readability1 mg
Pan Size5.1 in (130 mm)
Internal CalibrationAutoCal™ - Automatic
DraftshieldIncluded
Auxiliary Display ModelAvailable as an Accessory
Battery LifeNot Applicable
CommunicationRS232 (Included); USB (Included); Ethernet (Available as an Accessory)
Dimensions (HxLxW)13.8 in x 15.5 in x 9.1 in (350 mm x 393 mm x 230 mm)
DisplayFull-color 5.7 in VGA, touch screen
In-use coverIncluded
Legal for TradeNot Applicable
Linearity ±0.002 g
Minimum Weight (USP, 0.1%, typical)1.6 g
Net Weight15.2 lb (6.9 kg)
Pan ConstructionStainless Steel
PowerAC Adapter (Included)
Repeatability (typical)0.001 g
Stabilization Time1 s
Tare RangeTo capacity by subtraction
Units of MeasurementBaht; Carat; Custom; Grain; Gram; Hong Kong Tael; Kilogram; Milligram; Mesghal; Momme; Newton; Ounce; Ounce Troy; Pennyweight; Pound; Singapore Tael; Taiwan Tael; Tical; Tola
Working Environment50°F – 86°F, 85%RH, non-condensing (10°C – 30°C, 85%RH, non-condensing)
About QuestPair

QuestPair is a platform to find and acquire laboratory equipment by connecting research organisations, universities, and companies with high-quality, affordable instruments. The platform facilitates multiple sales daily worldwide and works with partners around the globe to provide trusted, vetted products for a wide variety of scientific needs. Our in-house developed AI algorithms collect data on the usage and availability of scientific instruments, enabling us to provide tailor-made assistance in sourcing suitable laboratory equipment. With a focus on cost-effectiveness and sustainability, QuestPair has an excellent track record in streamlining acquisitions for laboratories to further scientific research and development.

Related items:
Radwag F2 Mass Standard - Flat Polygonal Sheet - 5 mg-cover
Radwag F2 Mass Standard - Flat Polygonal Sheet - 5 mg

F2-class mass standards represent an impressive level of precision in mass measurement. Classified a (more)s metrology grade F2, they are recognized as top-quality tools suited for advanced applications where precision is a key element. F2 mass standard: flat polygonal sheet Nominal value: 5 mg Material: aluminum F2 Class Mass Standards – Key Features Exceptional Measurement Precision - F2 class mass standards feature excellent measurement precision achieved through stringent standards for allowable deviation from actual weight. Stability under Dynamic Conditions - An important feature of F2-class mass standards is their ability to maintain measurement stability even under dynamic measurement conditions. They are designed to cope with a variety of factors that affect measurement precision. Calibration at the Highest Level - The calibration process of F2-class mass standards adheres to the most stringent norms and standards. This makes the standards of this class recognized as tools with the highest degree of accuracy, complying with international requirements. Use of Materials with Outstanding Properties - F2 class mass standards are often constructed from materials with outstanding physical properties. This ensures not only excellent precision, but also exceptional durability. Application 1. Scientific Research at the Highest Level In scientific research, especially in fields that require the utmost precision, such as nuclear physics or astrophysics, F2 class mass standards are indispensable. 2. Metrology Industry In metrology laboratories engaged in testing and maintaining the most advanced measurement standards, F2 class standards are indispensable working tools. 3. High-Precision Testing Laboratories In laboratories specializing in research requiring the highest precision, such as forensic laboratories and materials testing, F2 class mass standards are essential. 4. Aerospace Industry In the precision mass measurements required in the aerospace industry, F2 class standards provide reliability and excellence. F2 class mass standards are the symbol of the highest precision in the field of mass measurement. Their use is crucial in the most advanced fields of science, industry and research.

€18.00 ex VAT
Poland
mass standards
Radwag XA100 - Adapter for Pipettes calibration 100 ml XA 5Y.A-cover
Radwag XA100 - Adapter for Pipettes calibration 100 ml XA 5Y.A

XA100 pipette calibration adapter enables calibration and/or verification of piston pipettes by mean (more)s of a gravimetric method using the XA analytical balence. Set content: base weighing pan weighing vessel evaporation ring glass chamber with an opening for dosing Evaporation ring is an integral part of the adapter that increases relative humidity inside the weighing chamber. With this evaporation of the liquid during calibration/verification is stopped. An integrated weighing pan enables centric loading of the vessel in the weighing chamber. The weighing pan and the vessel are housed in a glass chamber featuring an opening allowing the user to dispense liquid through it, and reducing air drafts. Vessel capacity: 100 ml Adapters for Pipettes Calibration Pipette calibration adapters are intended for calibration and verification of piston pipettes using gravimetric method. Use of the pipette calibration adapter reduces maximum capacity of the balance by the mass of the weighing vessel. The table below, which presents the minimum requirements in accordance with ISO 8655-6:2022 standard, enables to select suitable adapter for pipette calibration and respective balance version. The parameters of the balance have been selected so that the expanded uncertainty of measurement in use is less than ¼ of the maximum permissible error of the test object. Nominal volume of apparatus under test V Resolution (d) mg Repeatability (s)3mg Recommended balance Microbalances Analytical balances 0,5 µl ≤ V < 20 µl 0,001c 0,01d 0,006c, e 0,03d MYA 21.5Y XA 6/21.5Y.M.A XA 6/21.5Y.M XA 21.5Y.M.A XA 21.5Y.M XA 21/52.5Y.M.A XA 21/52.5Y.M XA 53.5Y.M.A XA 53.5Y.M 20 µl ≤ V < 200 µl 0,01 0,025 XA 52.5Y XA 110.5Y XA 82/220.5Y.A XA 82/220.5Y XA 120/250.5Y.A XA 120/250.5Y 200 µl ≤ V ≤ 10 ml 0,1 0,2 Adapter for pipette calibration MY 11 XA 11 XA 11 XA 11 XA 11 XA 17 XA 17 XA 17 XA 100 XA 17 XA 100 Maximum vessel capacity 11 ml 11 ml 11 ml 11 ml 11 ml 17 ml 17 ml 17 ml 100 ml 17 ml 100 ml Weighing vessel mass ~ 10 g ~ 10 g ~ 10 g ~ 10 g ~ 10 g ~ 11 g ~ 11 g ~ 11 g ~ 65 g ~ 11 g ~ 65 g a The repeatability values, in this table, apply in the volumen determination of a single channel pipette. When a single-channel balance is used for volumen determination of single channel pipettes the repeatability values are double the values of this table. c Single-channel balance. d Multichannel balance, only valid for multi-channel pipettes. Multi-channel balances of 0,01 mg readability may be uses to test multi-channel pipettes with nominla volumes below 20 µl only if the expanded uncertainty in use is less than ¼ of the maximum permissible systematic error of the test object. e For single-channel pipettes of nominal volumes of less than 2 µl, a balance with repeatability better than the values in the table shall be used so that the expanded uncertainty in use is less than ¼ of the maximum permissible systematic error of the test object. table {font-size: 12px} td {padding:10px; } tr {text-align:center;} @media (max-width: 800px) { table {font-size: 9px} td {padding: 1px 1px} }

€1,108.00 ex VAT
Poland
analytical balances, analytical balances accessories, balances, balances accessories, microbalances, microbalances accessories, pipettes, pipettes calibration, scales, ultra & microbalances accessories, ultra microbalances
Radwag MA 110.X7.IC.A Moisture Analyzer-cover
Radwag MA 110.X7.IC.A Moisture Analyzer

MA X7.IC.A moisture analyzers are hi-tech measuring instruments intended for quick determination of  (more)relative moisture content, dry mass content and other parameters in samples of different substances. MA.X7.IC.A series is equipped with innovative system: the drying chamber can be opened and closed automatically using button or proximity sensors. Such solution allows: Maintaining moisture analyzer clean – operator does not touch moisture analyzer’s housing. Removing any shocks caused by manual closing of the chamber – the chamber closes automatically and always with the same intensity. Achieving high repeatability of opening and closing the drying chamber. Enhancing drying process automation. Enhancing safety of operation by eliminating contact with hot components of drying chamber. Improving operation ergonomics. MA.X7.IC.A series features user-friendly colour touchscreen. Free configuration of the control panel can be done by means of hotkeys, customizable information fields and programmable labels. Drying process can be carried out for any temperature and – thanks to databases – particular drying process may be set for a specific product. Highlights of X7 Series moisture analyzers: Automatic opening and closing of the drying chamber 7” capacitive colour touchpad Modern interface Uncomplicated, intuitive operation Programmable display Drying profiles (standard, mild, step, fast) GLP/GMP printouts-reports Repeatable and customized applications Work optimization due to the use of halogen lamps Capacity and temperature MA.X7.IC.A maximum capacity ranges from 50g/0.1mg to 210g/0.1mg. Moisture content is measured with the 0.01% accuracy (0.001 % for samples bigger than 1.5g). The maximum drying temperature is 160˚C (there is an optional moisture analyzer with 250˚C maximum temperature). An additional element for moisture analyzers that improves their functionality is a water vapour permeability determination set used in tanning industry for determining hygienic properties of leather. Databases: Information system of X7 series moisture analyzers is based on 8 databases, allowing many users to operate product database comprising many samples. Collected measurements may be subjected to subsequent analysis. Collected data is registered in 8 databases: Products (up to 5000 products) Users (up to 100 users) Packaging (up to 100 packagings) Customers (up to 1000 customers) Drying programs (up to 200 drying programs) Drying process reports (up to 5000 drying process reports) Ambient conditions (up to 10000 records) Weighings (up to 50000 records) The results The results obtained using the moisture analyzer (the final result of the drying process): % M – the mass loss in %; displays the mass change recorded during the drying process, expressed as a percentage, % D – the dry mass obtained during the drying process, expressed as a percentage; the result is the portion of the sample that remains on the weighing pan after the moisture has evaporated, % R – the ratio of moisture content to dry mass, obtained during the drying process, expressed as a percentage; the result is the portion of the sample that evaporated during the drying process, g – the sample mass after drying. Interfaces USB interface ensures quick transfer and copying of any results of your work (measurements, reports, databases) to a computer or other moisture analyzer. Remote access to the moisture analyzer allows for online data management. Cooperation with E2R allows for external data management which in turn increases the efficiency and results to the maximum.

€2,098.00 ex VAT
Poland
moisture analysers, balances
Radwag MA 200/1.X2.A.NS Moisture Analyzer-cover
Radwag MA 200/1.X2.A.NS Moisture Analyzer

MA X2.A moisture analyzers are hi-tech measuring instruments intended for quick determination of rel (more)ative moisture content, dry mass content and other parameters in samples of different substances. MA.X2.A series is equipped with innovative system: the drying chamber can be opened and closed automatically using button or proximity sensors. Such solution allows: Maintaining moisture analyzer clean – operator does not touch moisture analyzer’s housing. Removing any shocks caused by manual closing of the chamber – the chamber closes automatically and always with the same intensity. Achieving high repeatability of opening and closing the drying chamber. Enhancing drying process automation. Enhancing safety of operation by eliminating contact with hot components of drying chamber. Improving operation ergonomics. MA.X2.A series features user-friendly colour touchscreen. Free configuration of the control panel can be done by means of hotkeys, customizable information fields and programmable labels. Drying process can be carried out for any temperature and – thanks to databases – particular drying process may be set for a specific product. Highlights of X2 Series moisture analyzers: Automatic opening and closing of the drying chamber 5” capacitive colour touchpad Modern interface Uncomplicated, intuitive operation Programmable display Drying profiles (standard, mild, step, fast) GLP/GMP printouts-reports Repeatable and customized applications Work optimization due to the use of halogen lamps Capacity and temperature MA.X2.A maximum capacity ranges from 50g/0.1mg to 210g/0.1mg. Moisture content is measured with the 0.01% accuracy (0.001 % for samples bigger than 1.5g). The maximum drying temperature is 160˚C (there is an optional moisture analyzer with 250˚C maximum temperature). An additional element for moisture analyzers that improves their functionality is a water vapour permeability determination set used in tanning industry for determining hygienic properties of leather. Databases: Information system of X2 series moisture analyzers is based on 8 databases, allowing many users to operate product database comprising many samples. Collected measurements may be subjected to subsequent analysis. Collected data is registered in 8 databases: Products (up to 5000 products) Users (up to 100 users) Packaging (up to 100 packagings) Customers (up to 1000 customers) Drying programs (up to 200 drying programs) Drying process reports (up to 5000 drying process reports) Ambient conditions (up to 10000 records) Weighings (up to 50000 records) The results The results obtained using the moisture analyzer (the final result of the drying process): % M – the mass loss in %; displays the mass change recorded during the drying process, expressed as a percentage, % D – the dry mass obtained during the drying process, expressed as a percentage; the result is the portion of the sample that remains on the weighing pan after the moisture has evaporated, % R – the ratio of moisture content to dry mass, obtained during the drying process, expressed as a percentage; the result is the portion of the sample that evaporated during the drying process, g – the sample mass after drying. Interfaces USB interface ensures quick transfer and copying of any results of your work (measurements, reports, databases) to a computer or other moisture analyzer. Remote access to the moisture analyzer allows for online data management. Cooperation with E2R allows for external data management which in turn increases the efficiency and results to the maximum.

€3,668.00 ex VAT
Poland
balances, moisture analysers
People are watching right now:
Radwag TMX15R.15.H3.K Multifunctional Scale-cover
Radwag TMX15R.15.H3.K Multifunctional Scale

Multifunctional scales TMX H is designed to fast and precise determination of mass in industrial con (more)ditions. TMX H Multifunctional scales TMX H comprises terminal PUE 5 and a weighing platform. Labelling system series TMX H is used to print labels for marking weighted goods e.g. in the process of packing. The program can generate standard labels for single goods. Functionality of the software: a function of weight control (weighing control + / -), previewing weighments carried out on weighing terminal as a table of weighments, simplified reporting module allowing the report to be generated, creation of label templates from labels in weighing terminal, identification of goods by using the code EAN-13 and EAN-128, quick search using the range of barcode scanner, the availability of databases: the operators, products, clients, warehouses, tares (packages), etc. The application enables measurements execution and their record into a local database or on the server. Networked terminals allow transmission of the measurements to the parent database installed on the server. The ability to work with a computer program E2R SYSTEM. Terminal types: PUE 5.15R, PUE 5.19R – resistive touch screen technology. Protection class IP68. High resistance to moisture and dust. In comparison to remaining models, limited brightness and lower resistance to shocks and scratches. Possibility of operation using gloves preventing scratches (latex, material). PUE 5.15IR, PUE 5.19IR – infrared touch screen technology. Protection class IP68. Very high brightness and readability level. High resistance to moisture and dust. High mechanical resistance, possibility of operation using gloves (made of latex, material or even steel chain). PUE 5.15C, PUE 5.19C – capacitive touch screen technology. Protection class IP68. High brightness and readability level. High resistance to moisture and dust, good mechanical resistance. Absolute precision of touch detection, sensing multiple points of touch (multi-touch).

€5,454.00 ex VAT
Poland
platform scales
Disclaimer: QuestPair assumes no responsibility or liability for any errors or omissions in the content of this site. The information contained in this site is provided and presented on an “as is“ basis with no guarantees of completeness, accuracy, usefulness or timeliness.

Customer Service

Here to help you with: Product Inquiries, Shipping & Support, Technical Support, Business Inquiries and Press.

We are available to assist you Mon-Fri, 10am - 5pm CET.
+31 (0) 73 7114717
[email protected]